Creative SpoonFeeding- Techniques To Learn Automobile Easy!
Some things have to be rote-learned, even after heavy dosage of understanding. More so with the subject of Automobile, with diagrams popping up in every question. That's a boon actually, I'll tell you how as we move on.
So what I'll try doing here is lighten that understanding dosage, and make you rote while you note! Join the fun!
Replies
-
Ambarish Ganesh
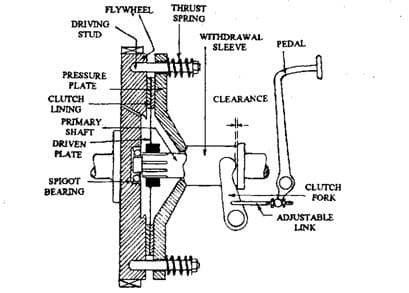
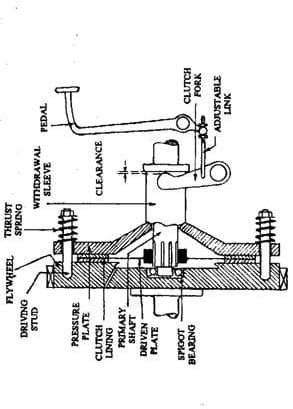
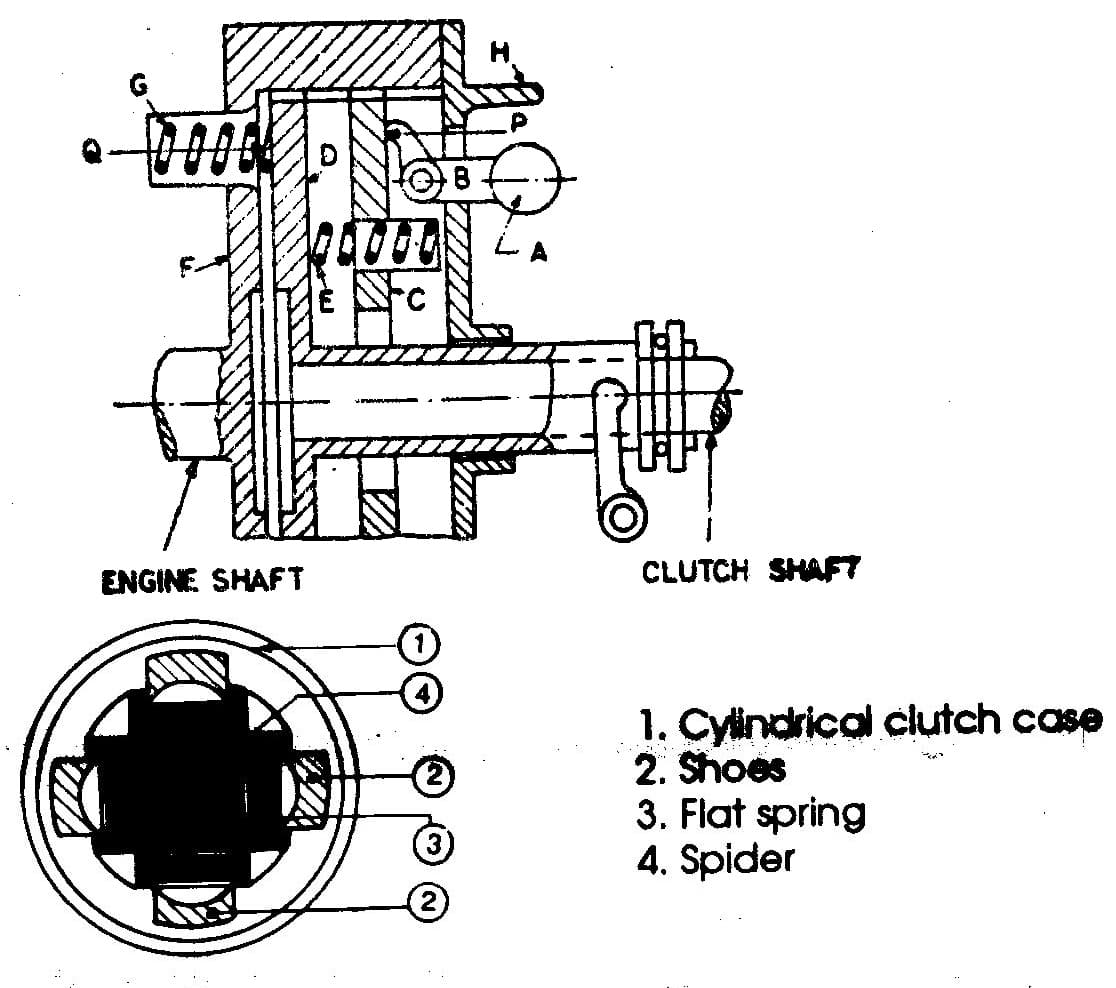
Synchromesh Gear Box-
First, let us rote the diagram. Yes, ROTE. Believe me, it'll take you maximum 5 minutes, and you'll never forget it throughout your life.
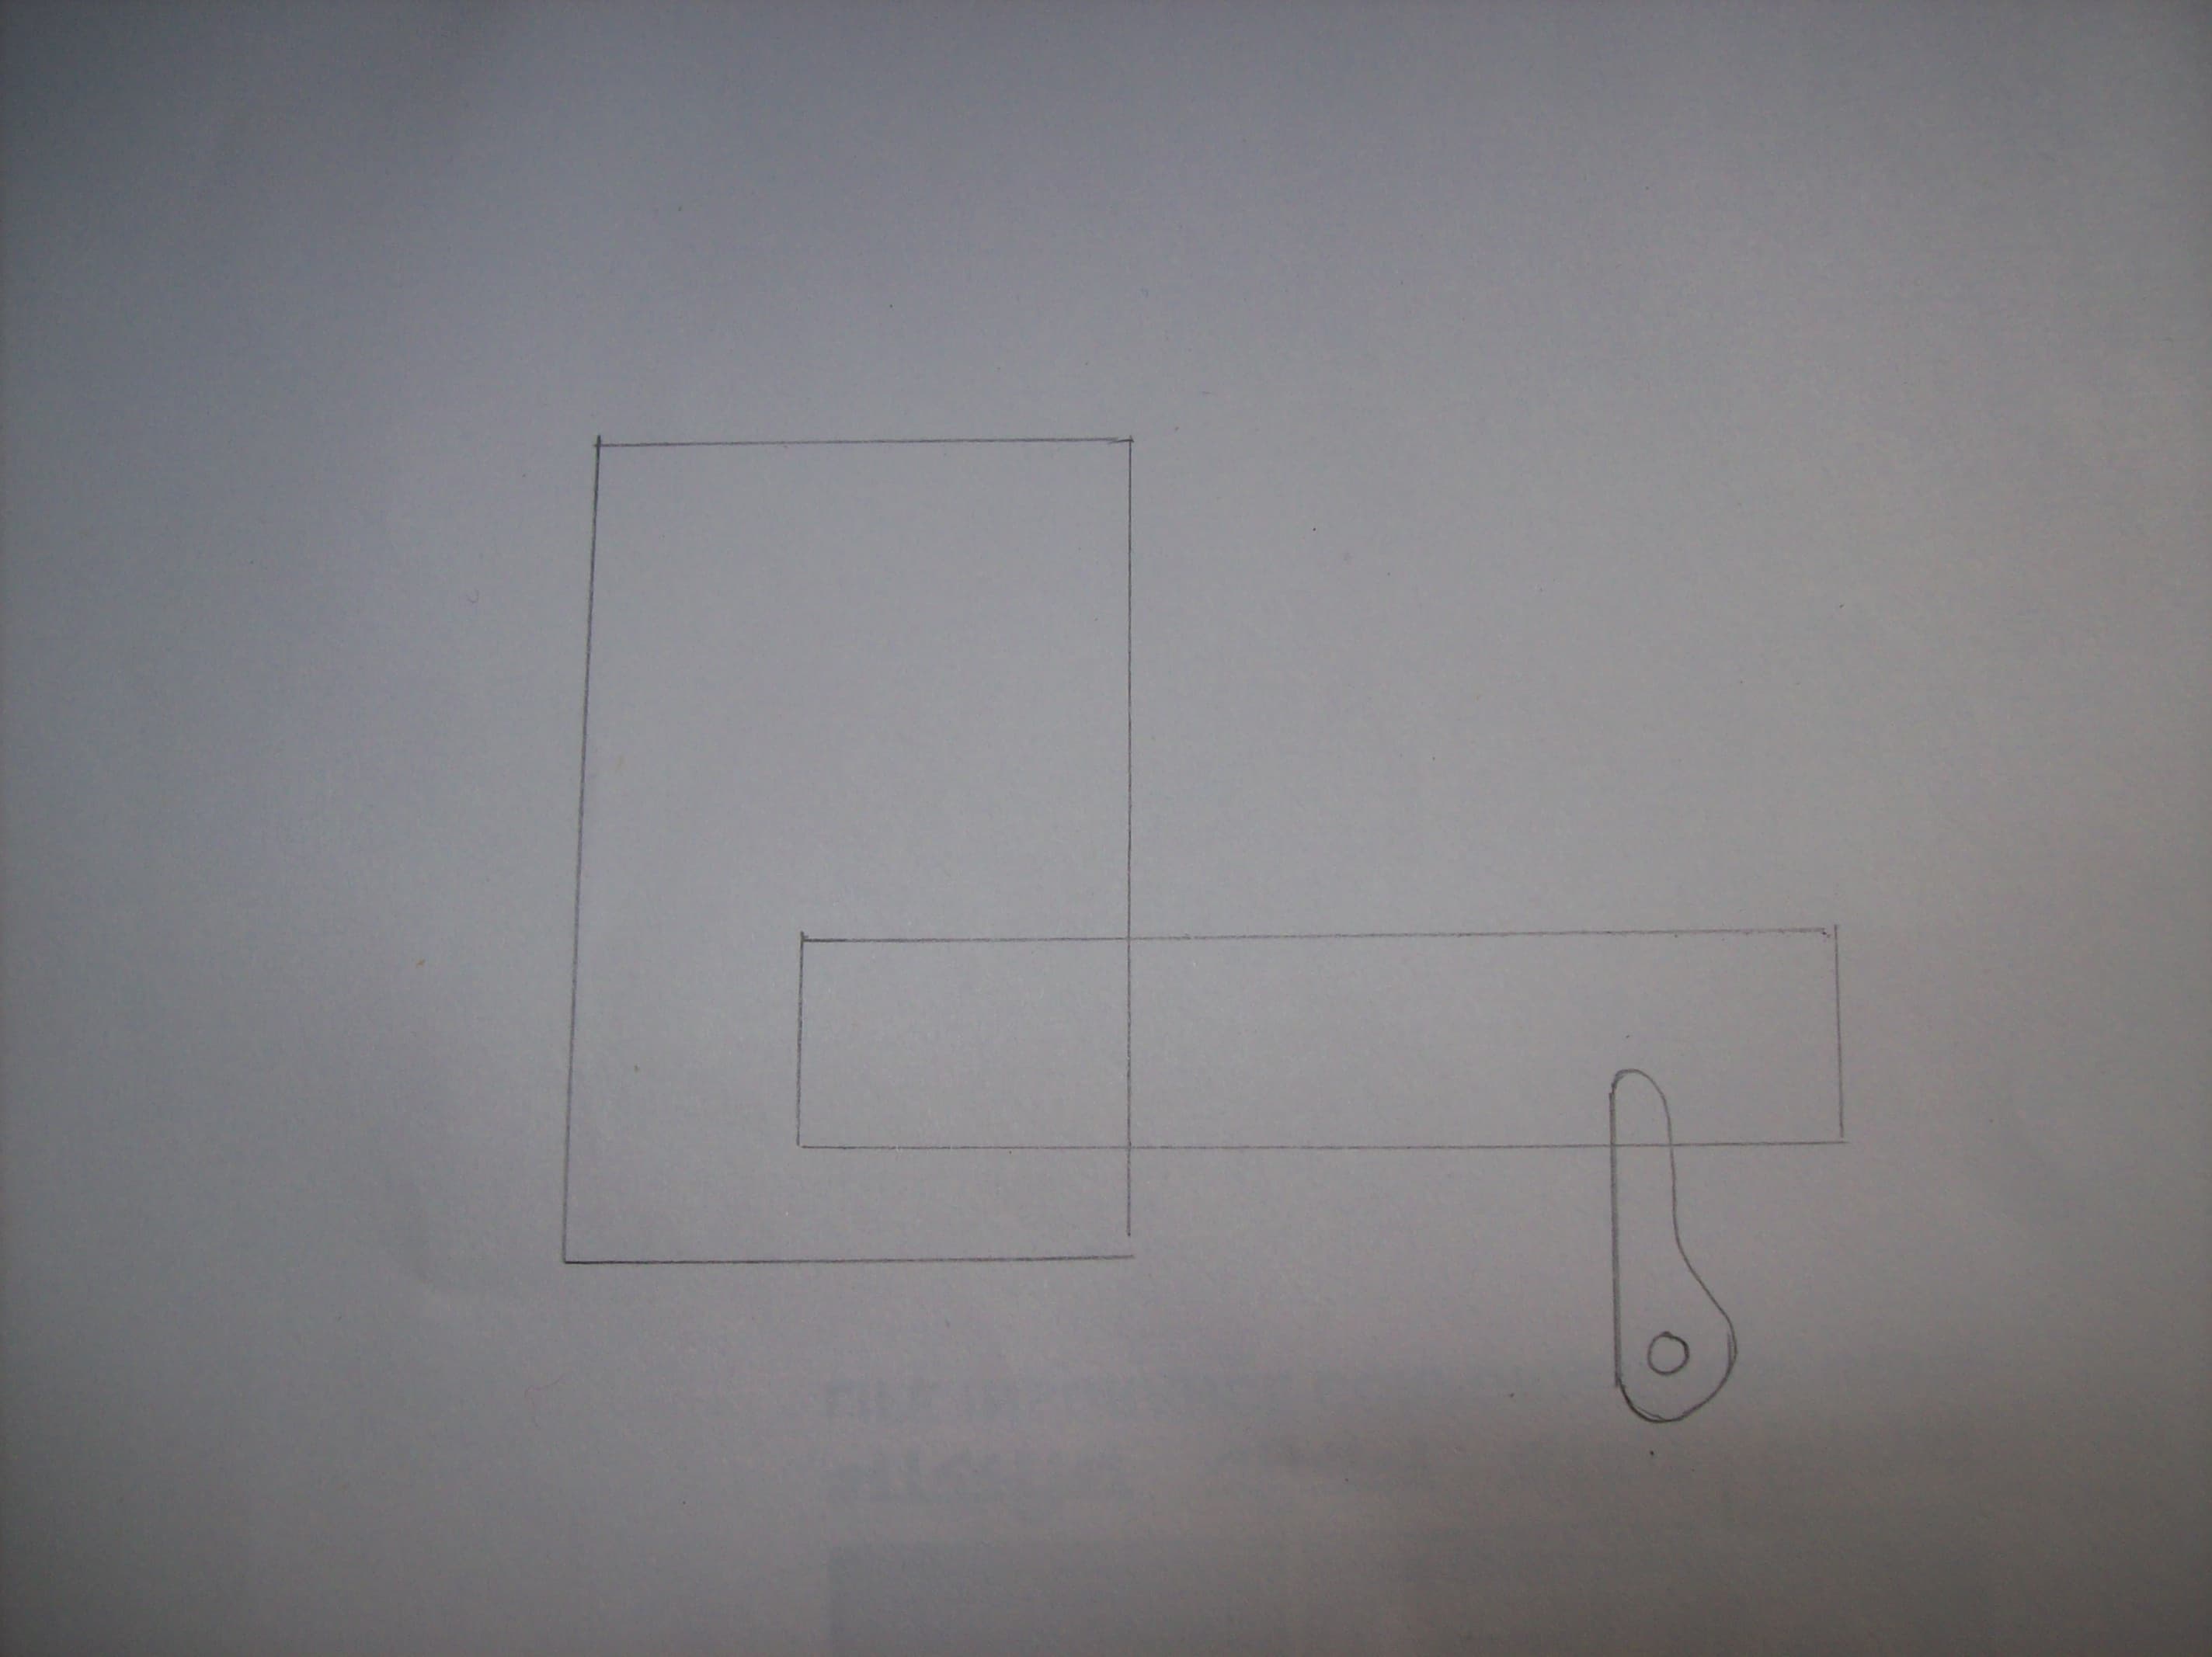
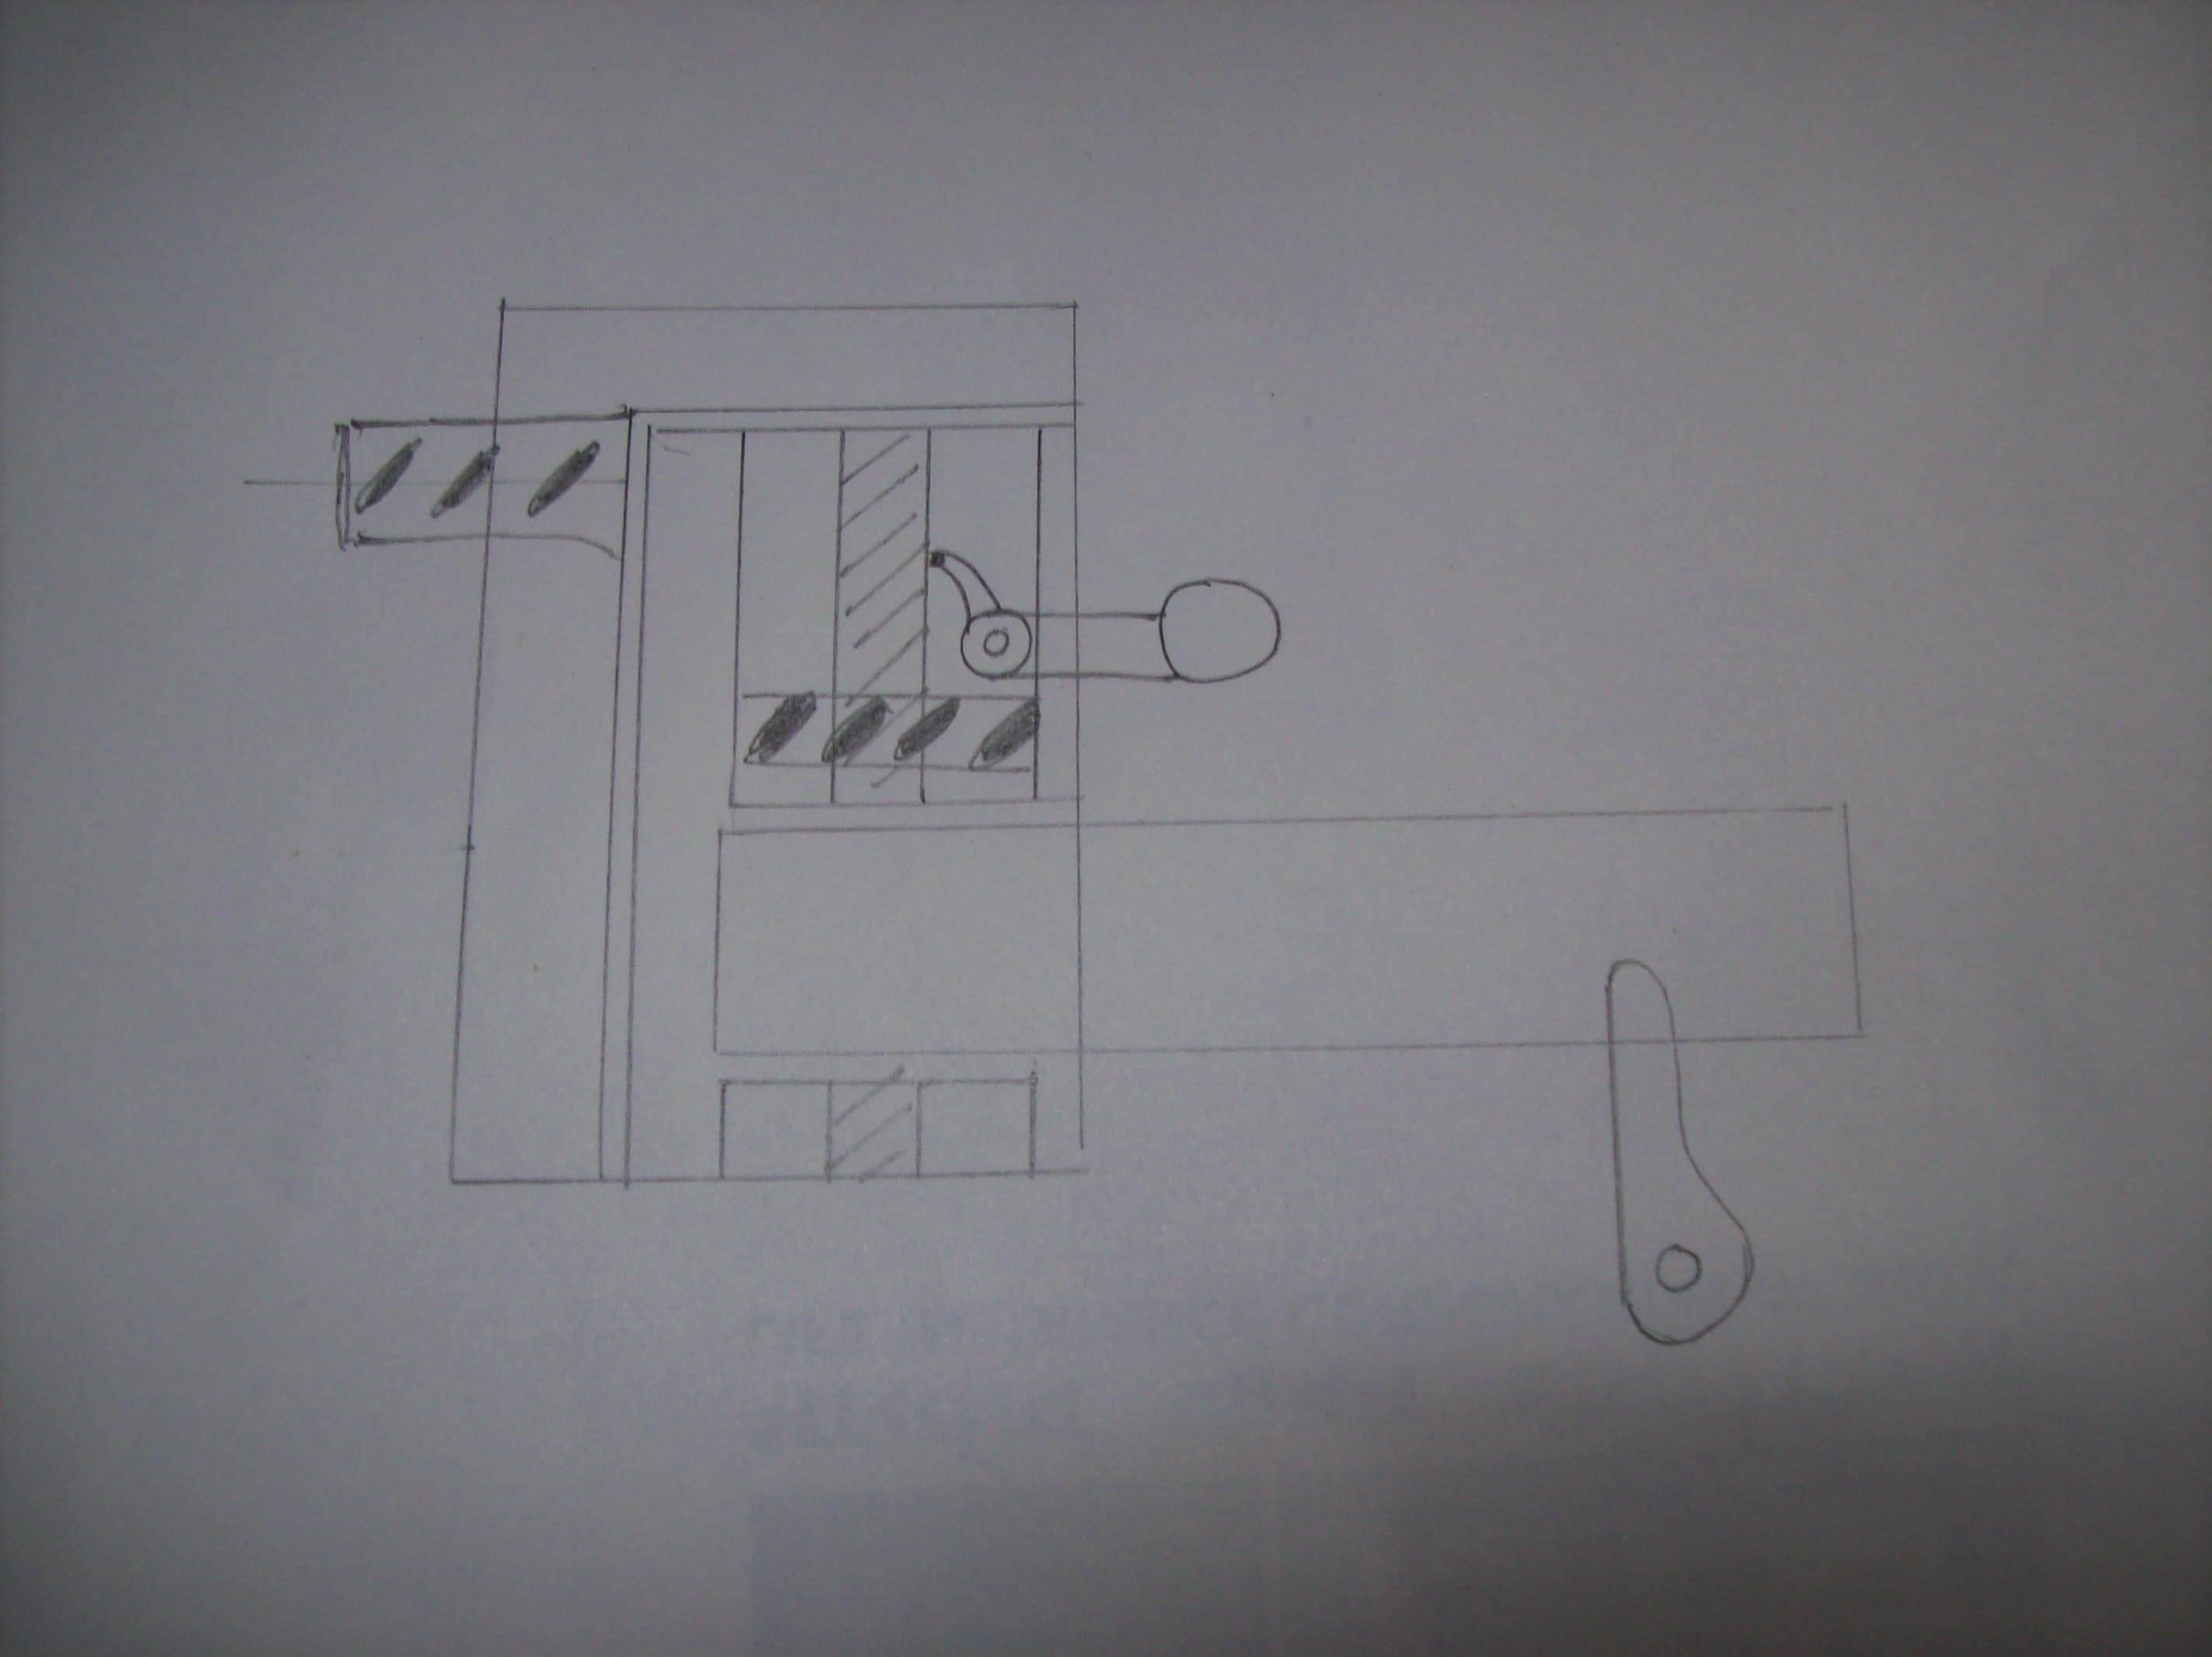
Step 1: As shown in figure, first draw a shaft, and two cursor-shaped things facing each other on either side of the shaft.
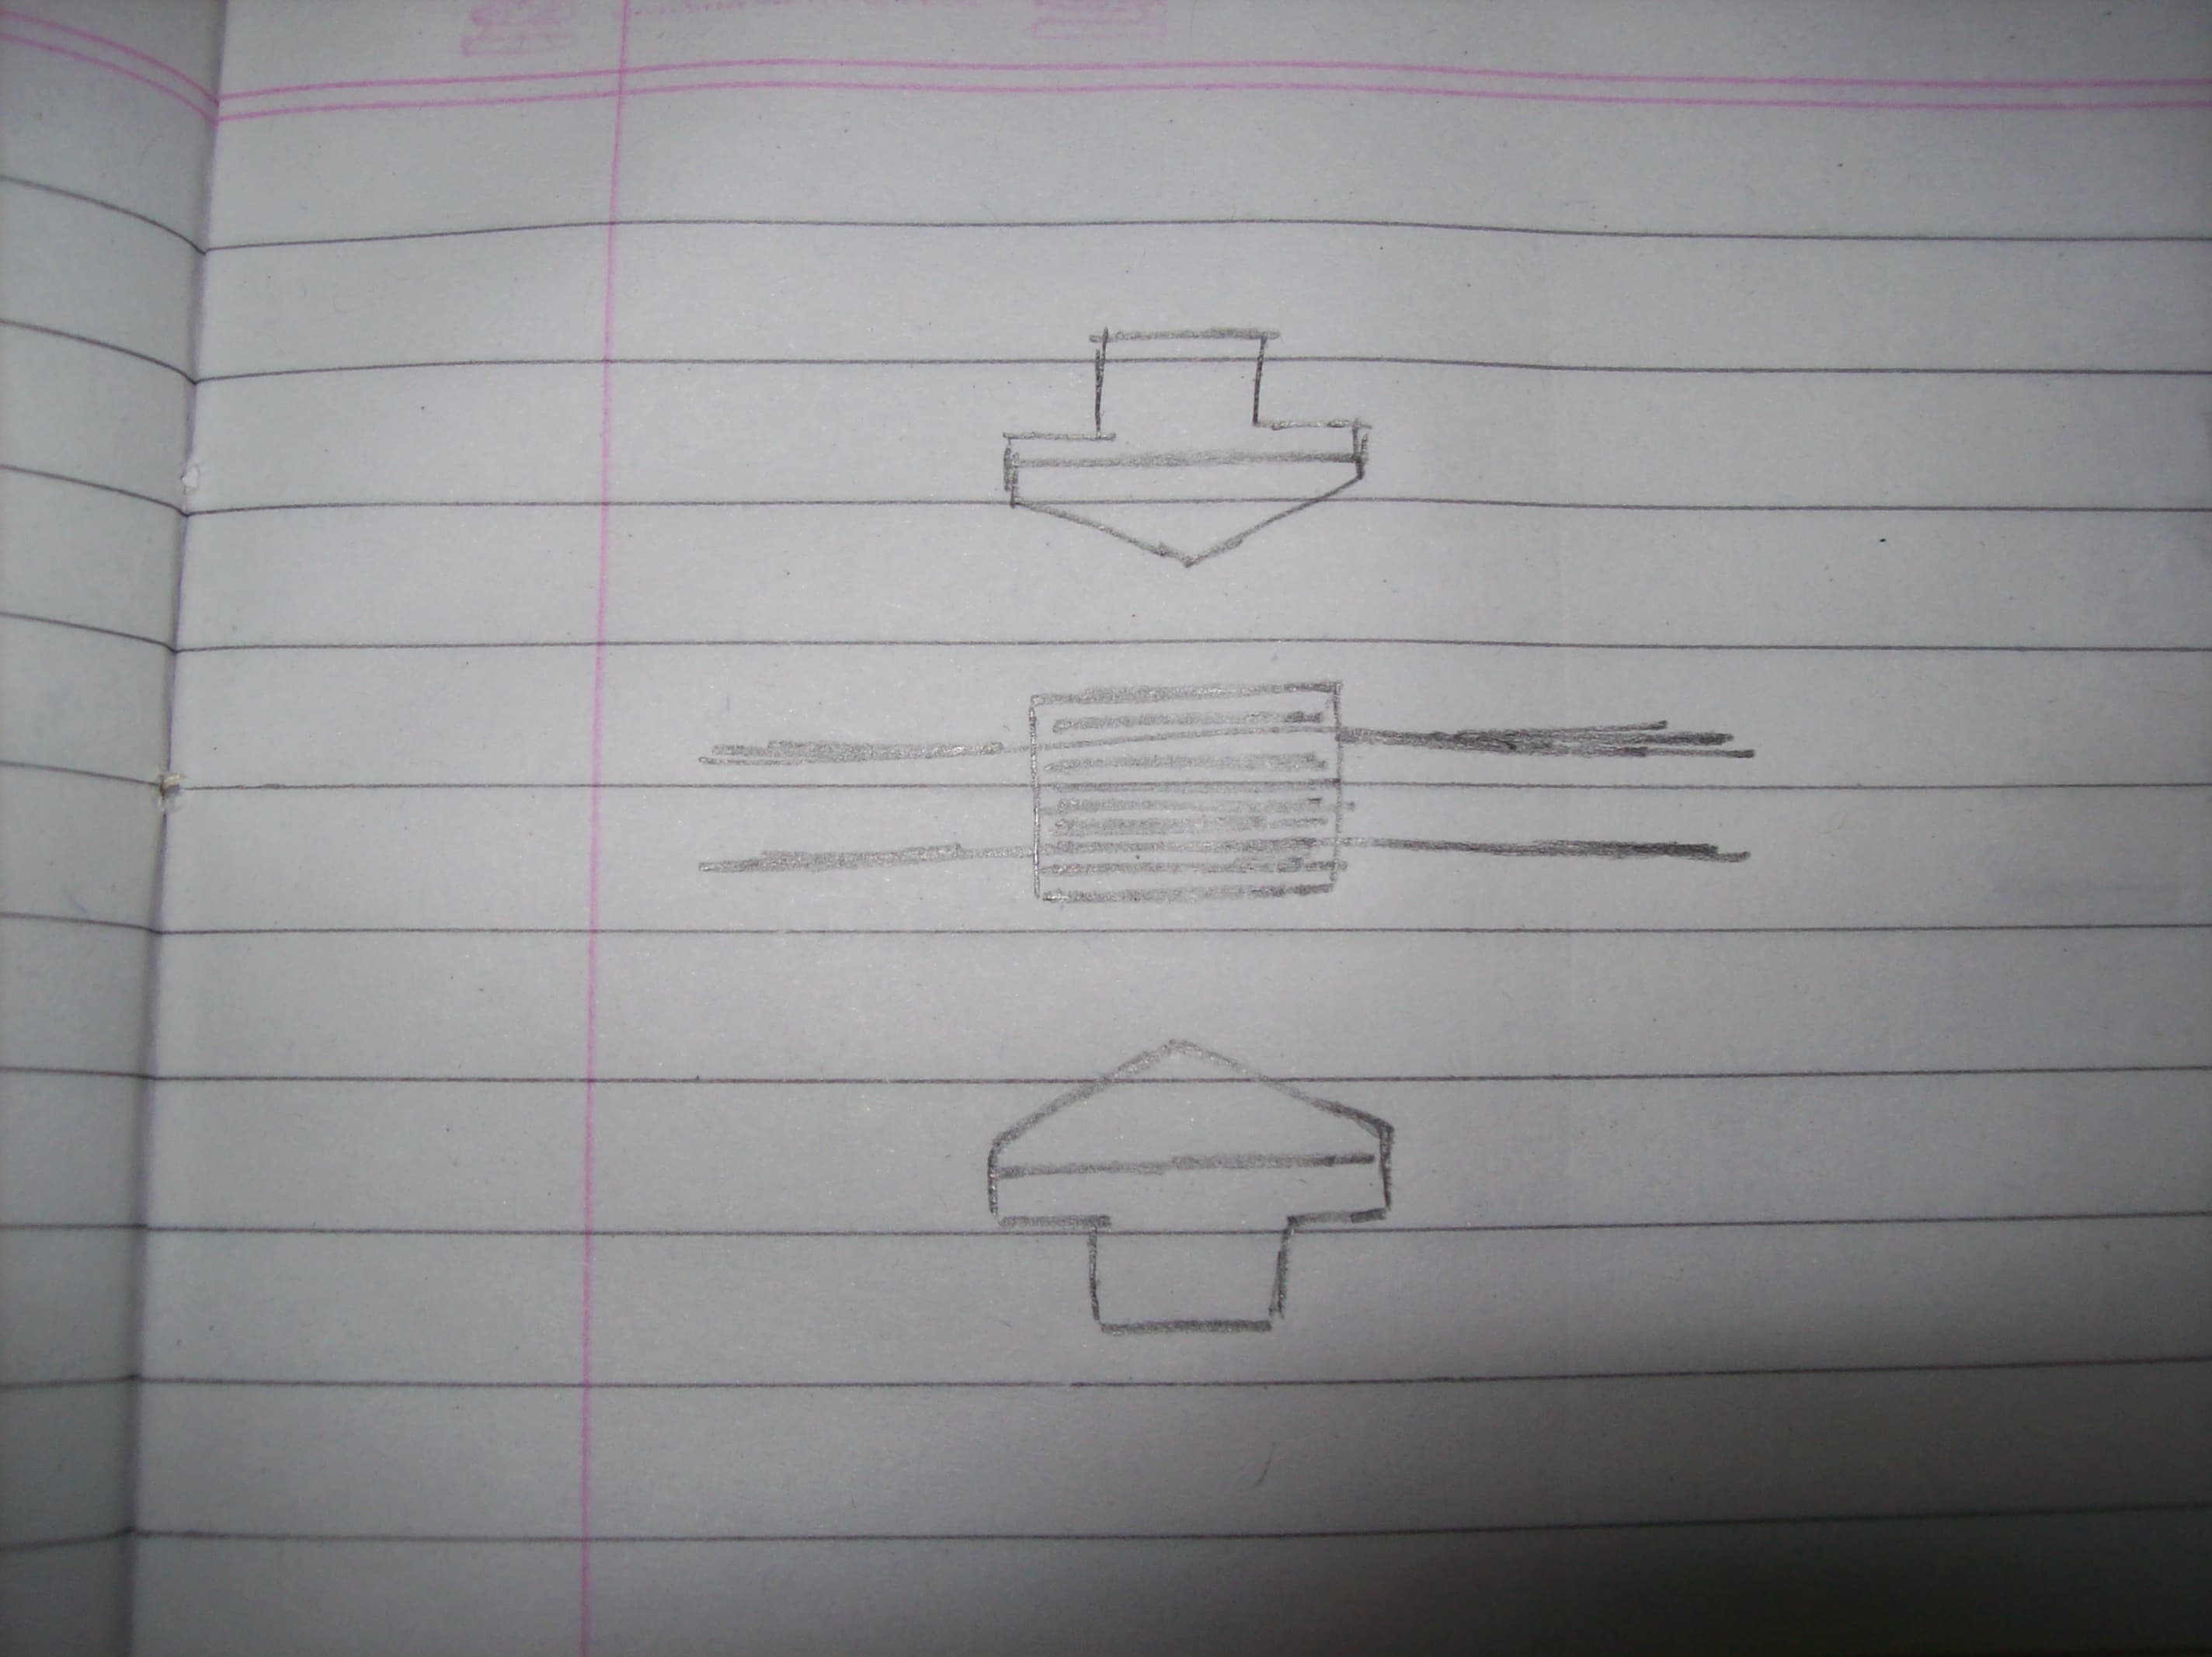
The shaded portion on the shaft is the SPLEEN.
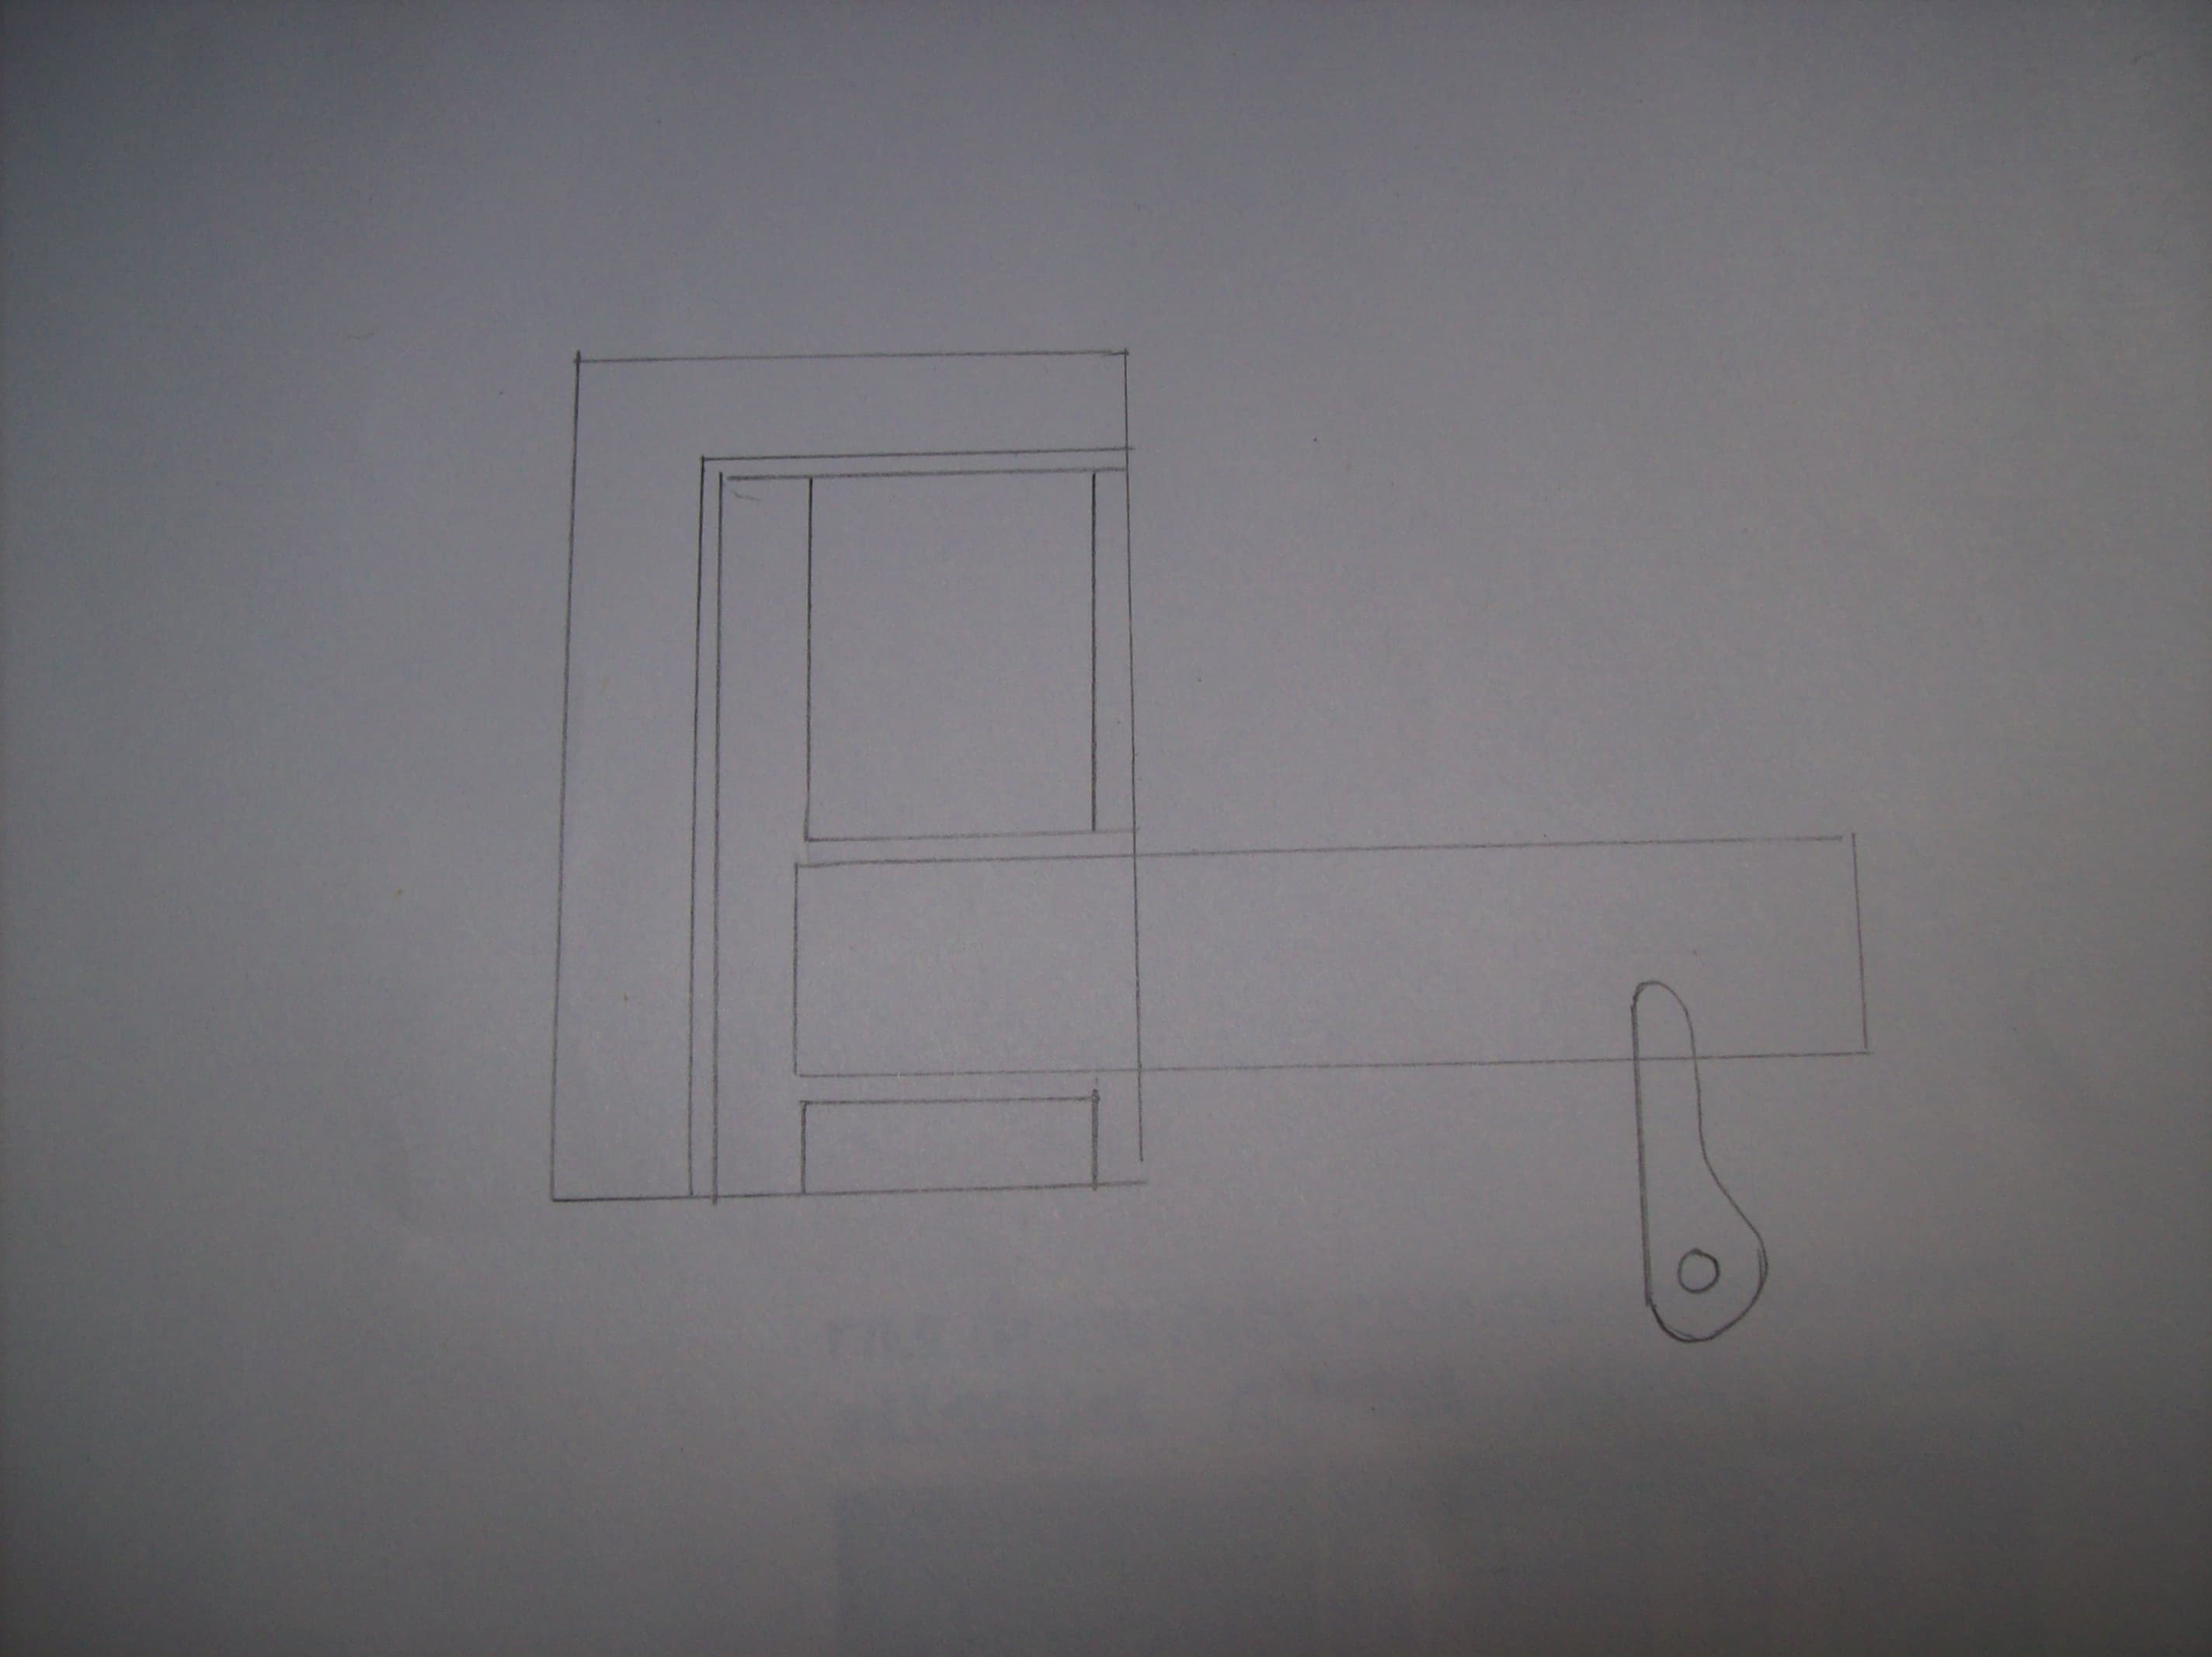
Step 2: Link the cursor-like things to the spleen, and draw a box covering the spleen.
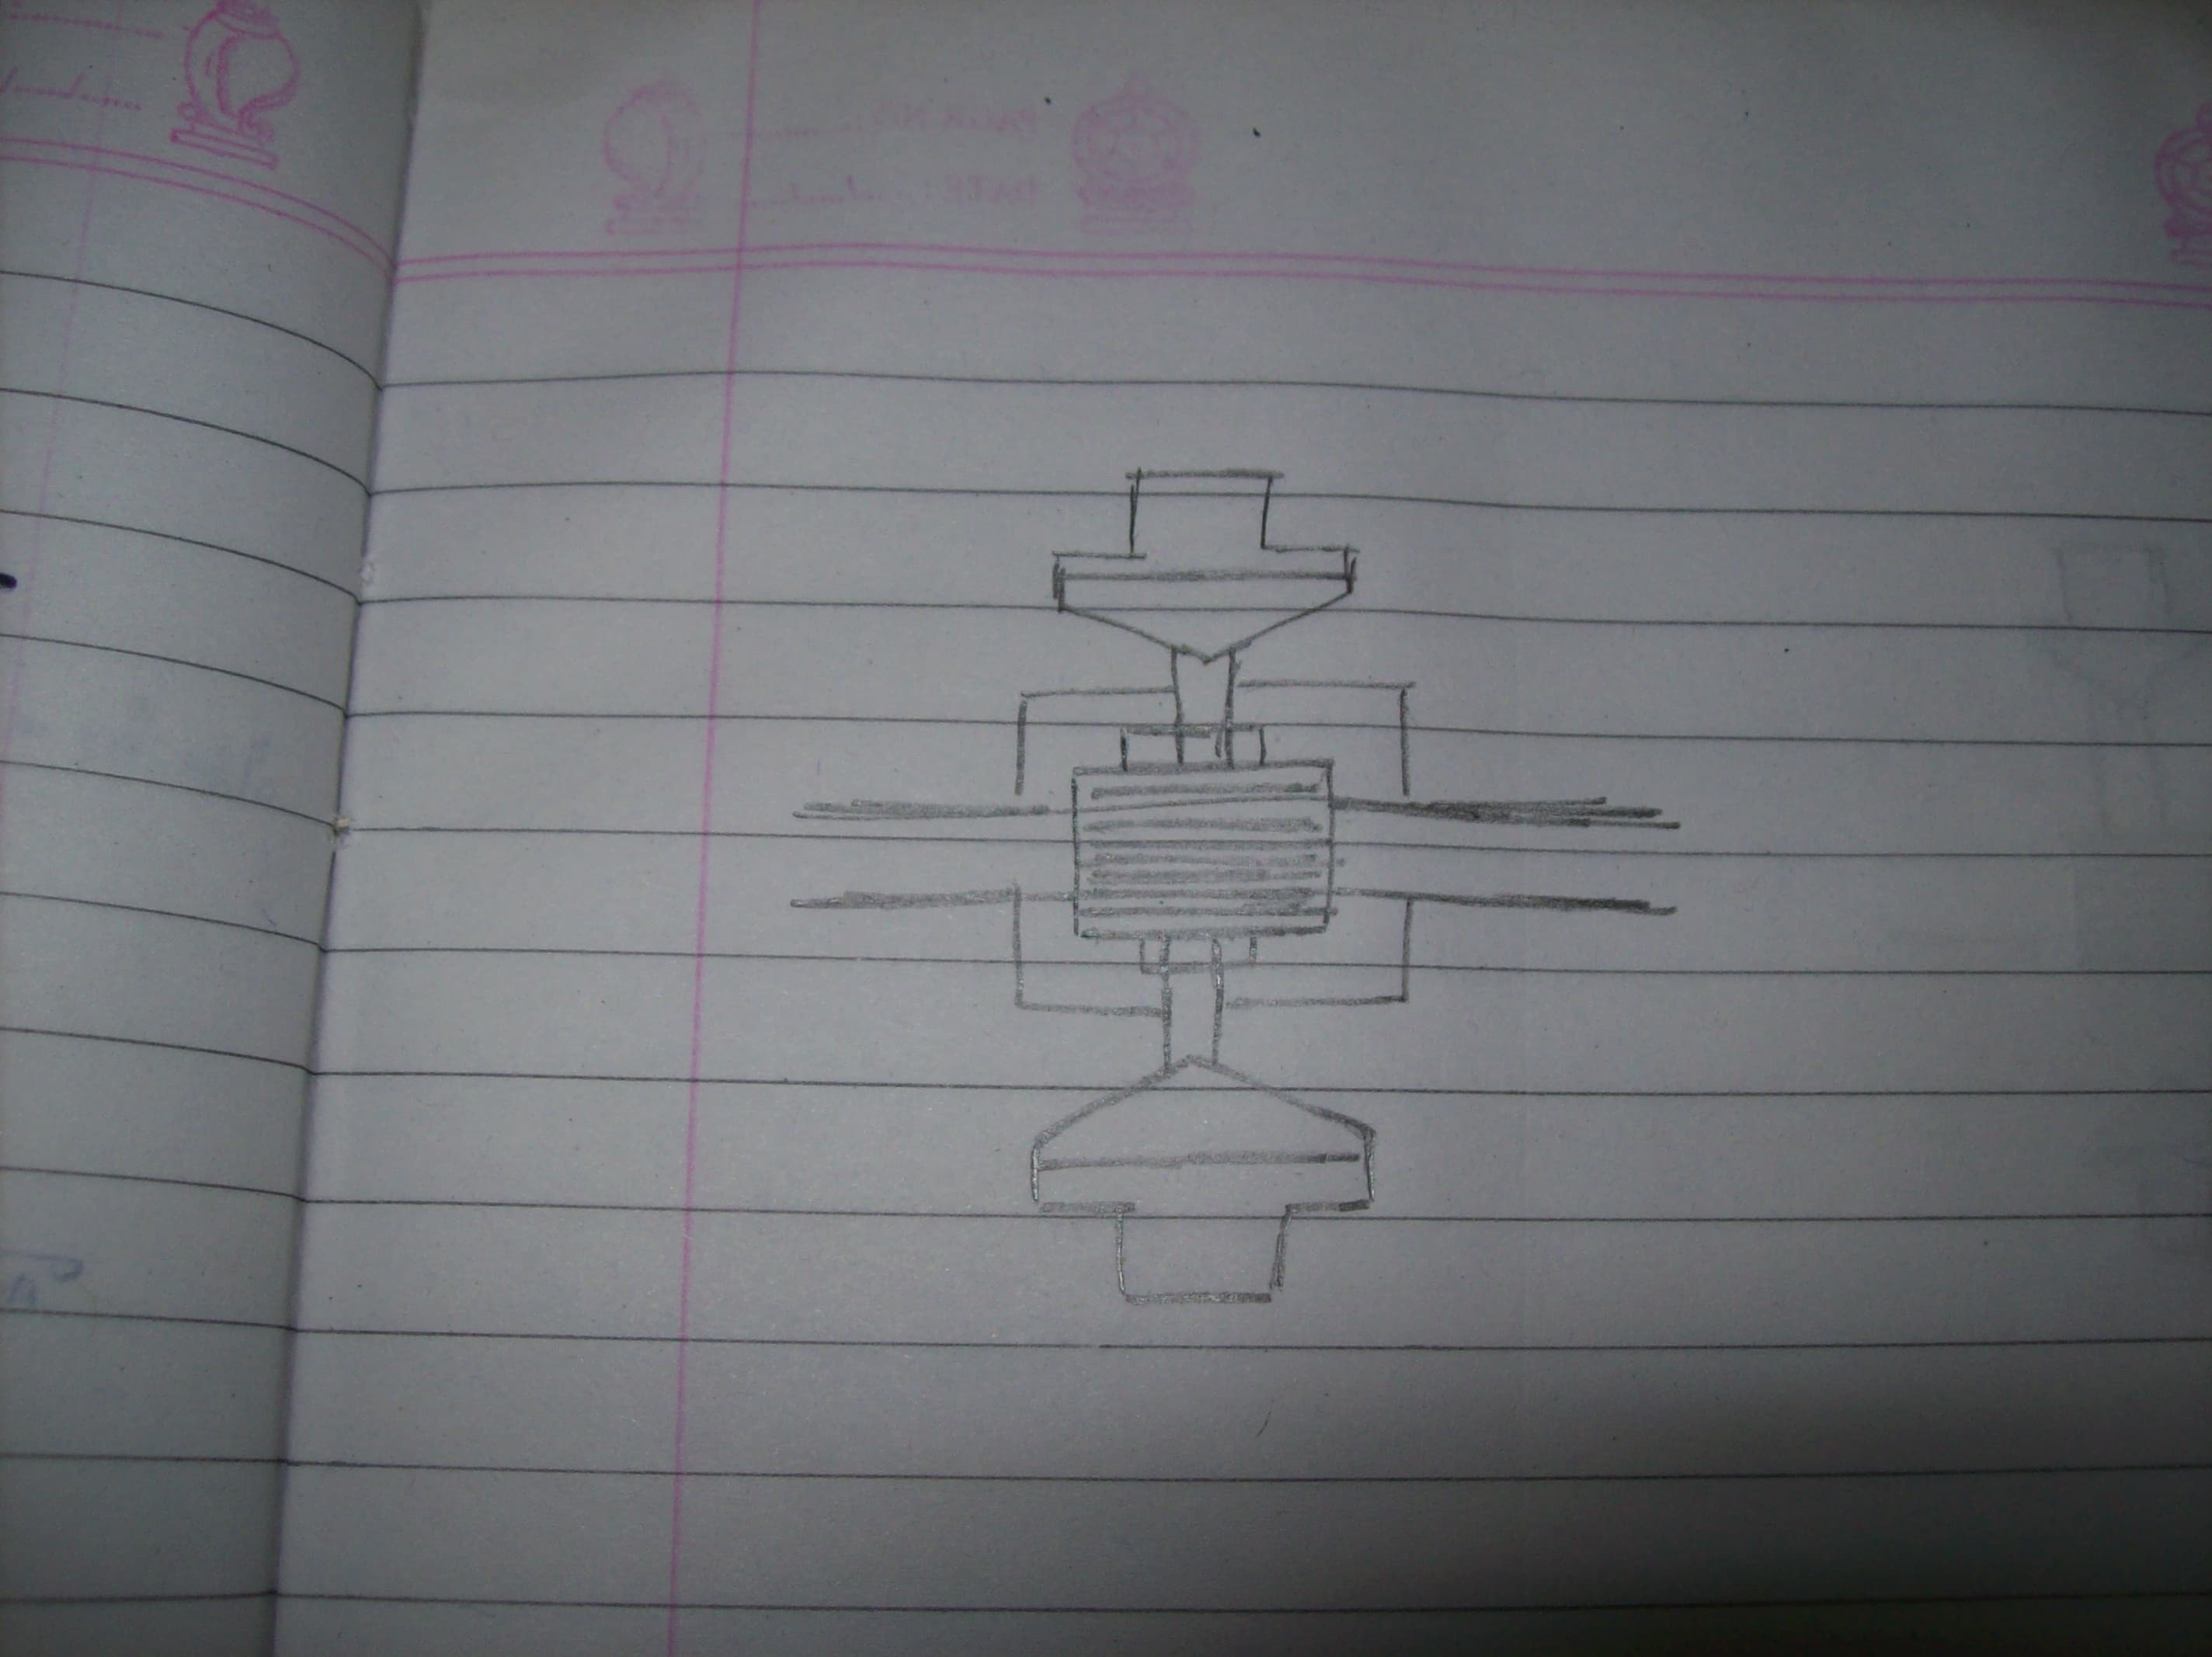
Step 3: Now make the outer body for the same, and while doing so, make sure that you don't omit the DOG TEETH(The bumps right beside the cursors), and note that they lie on a bigger shaft(The CLUTCH SHAFT).
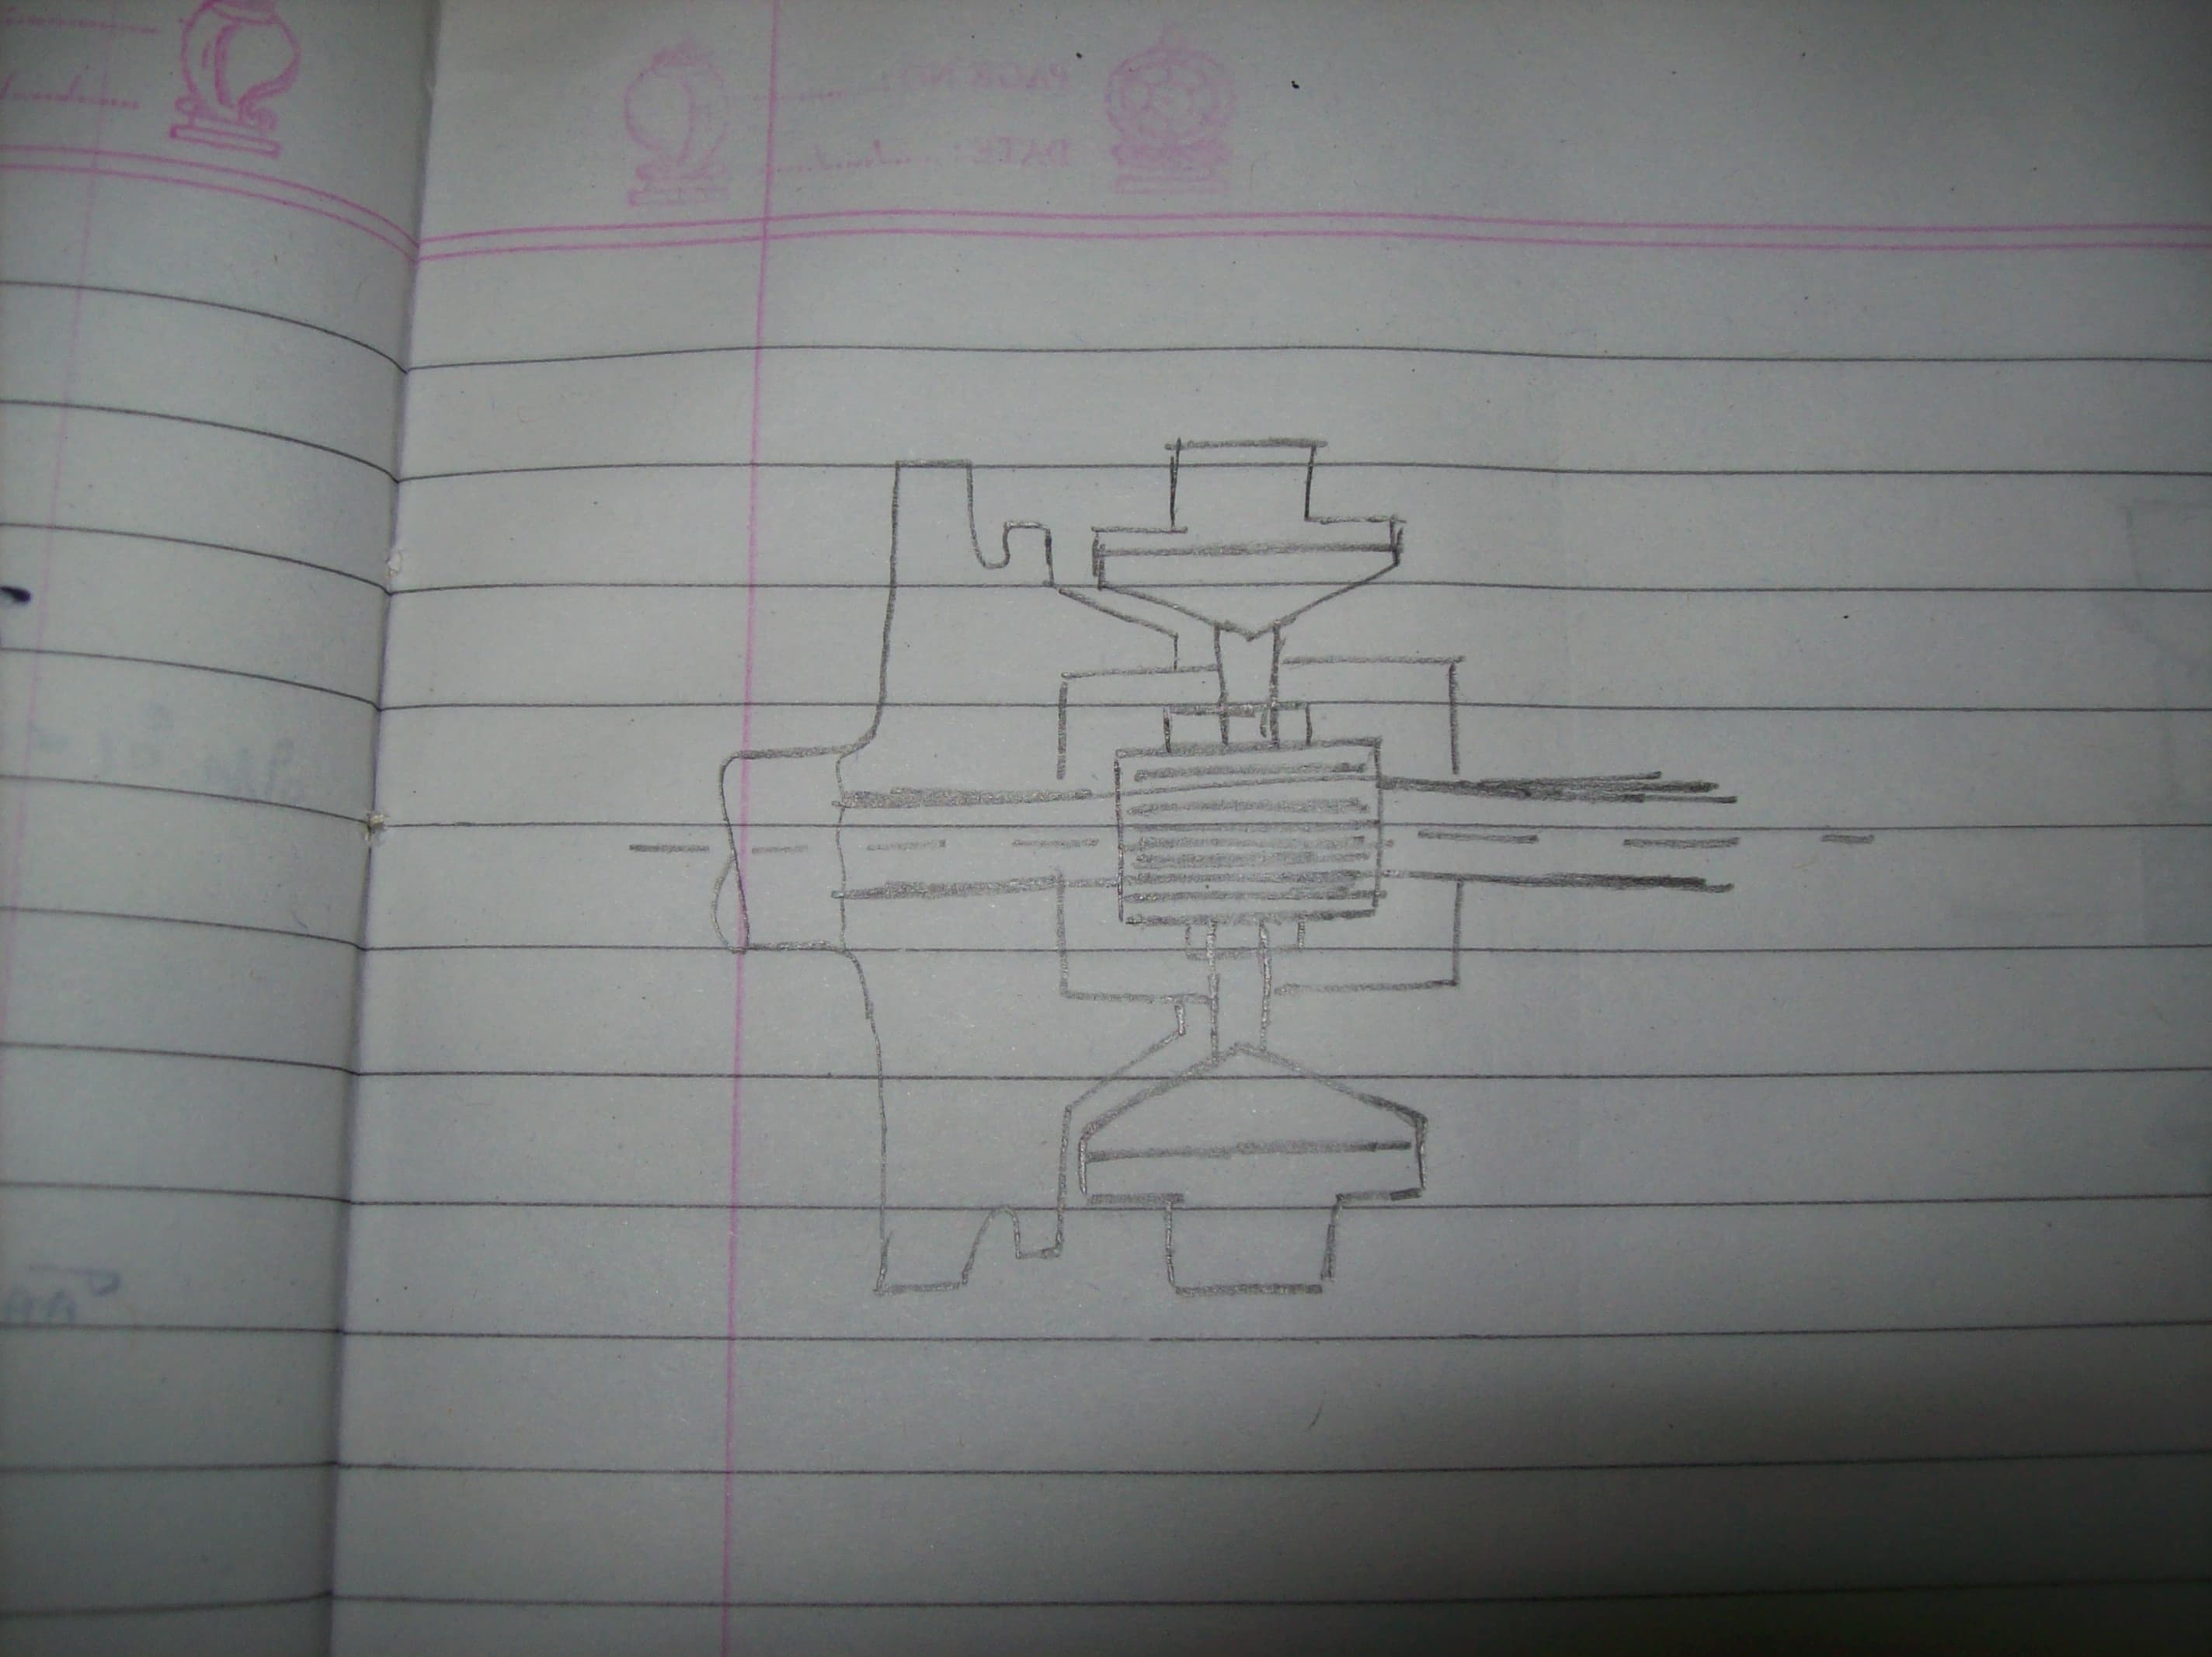
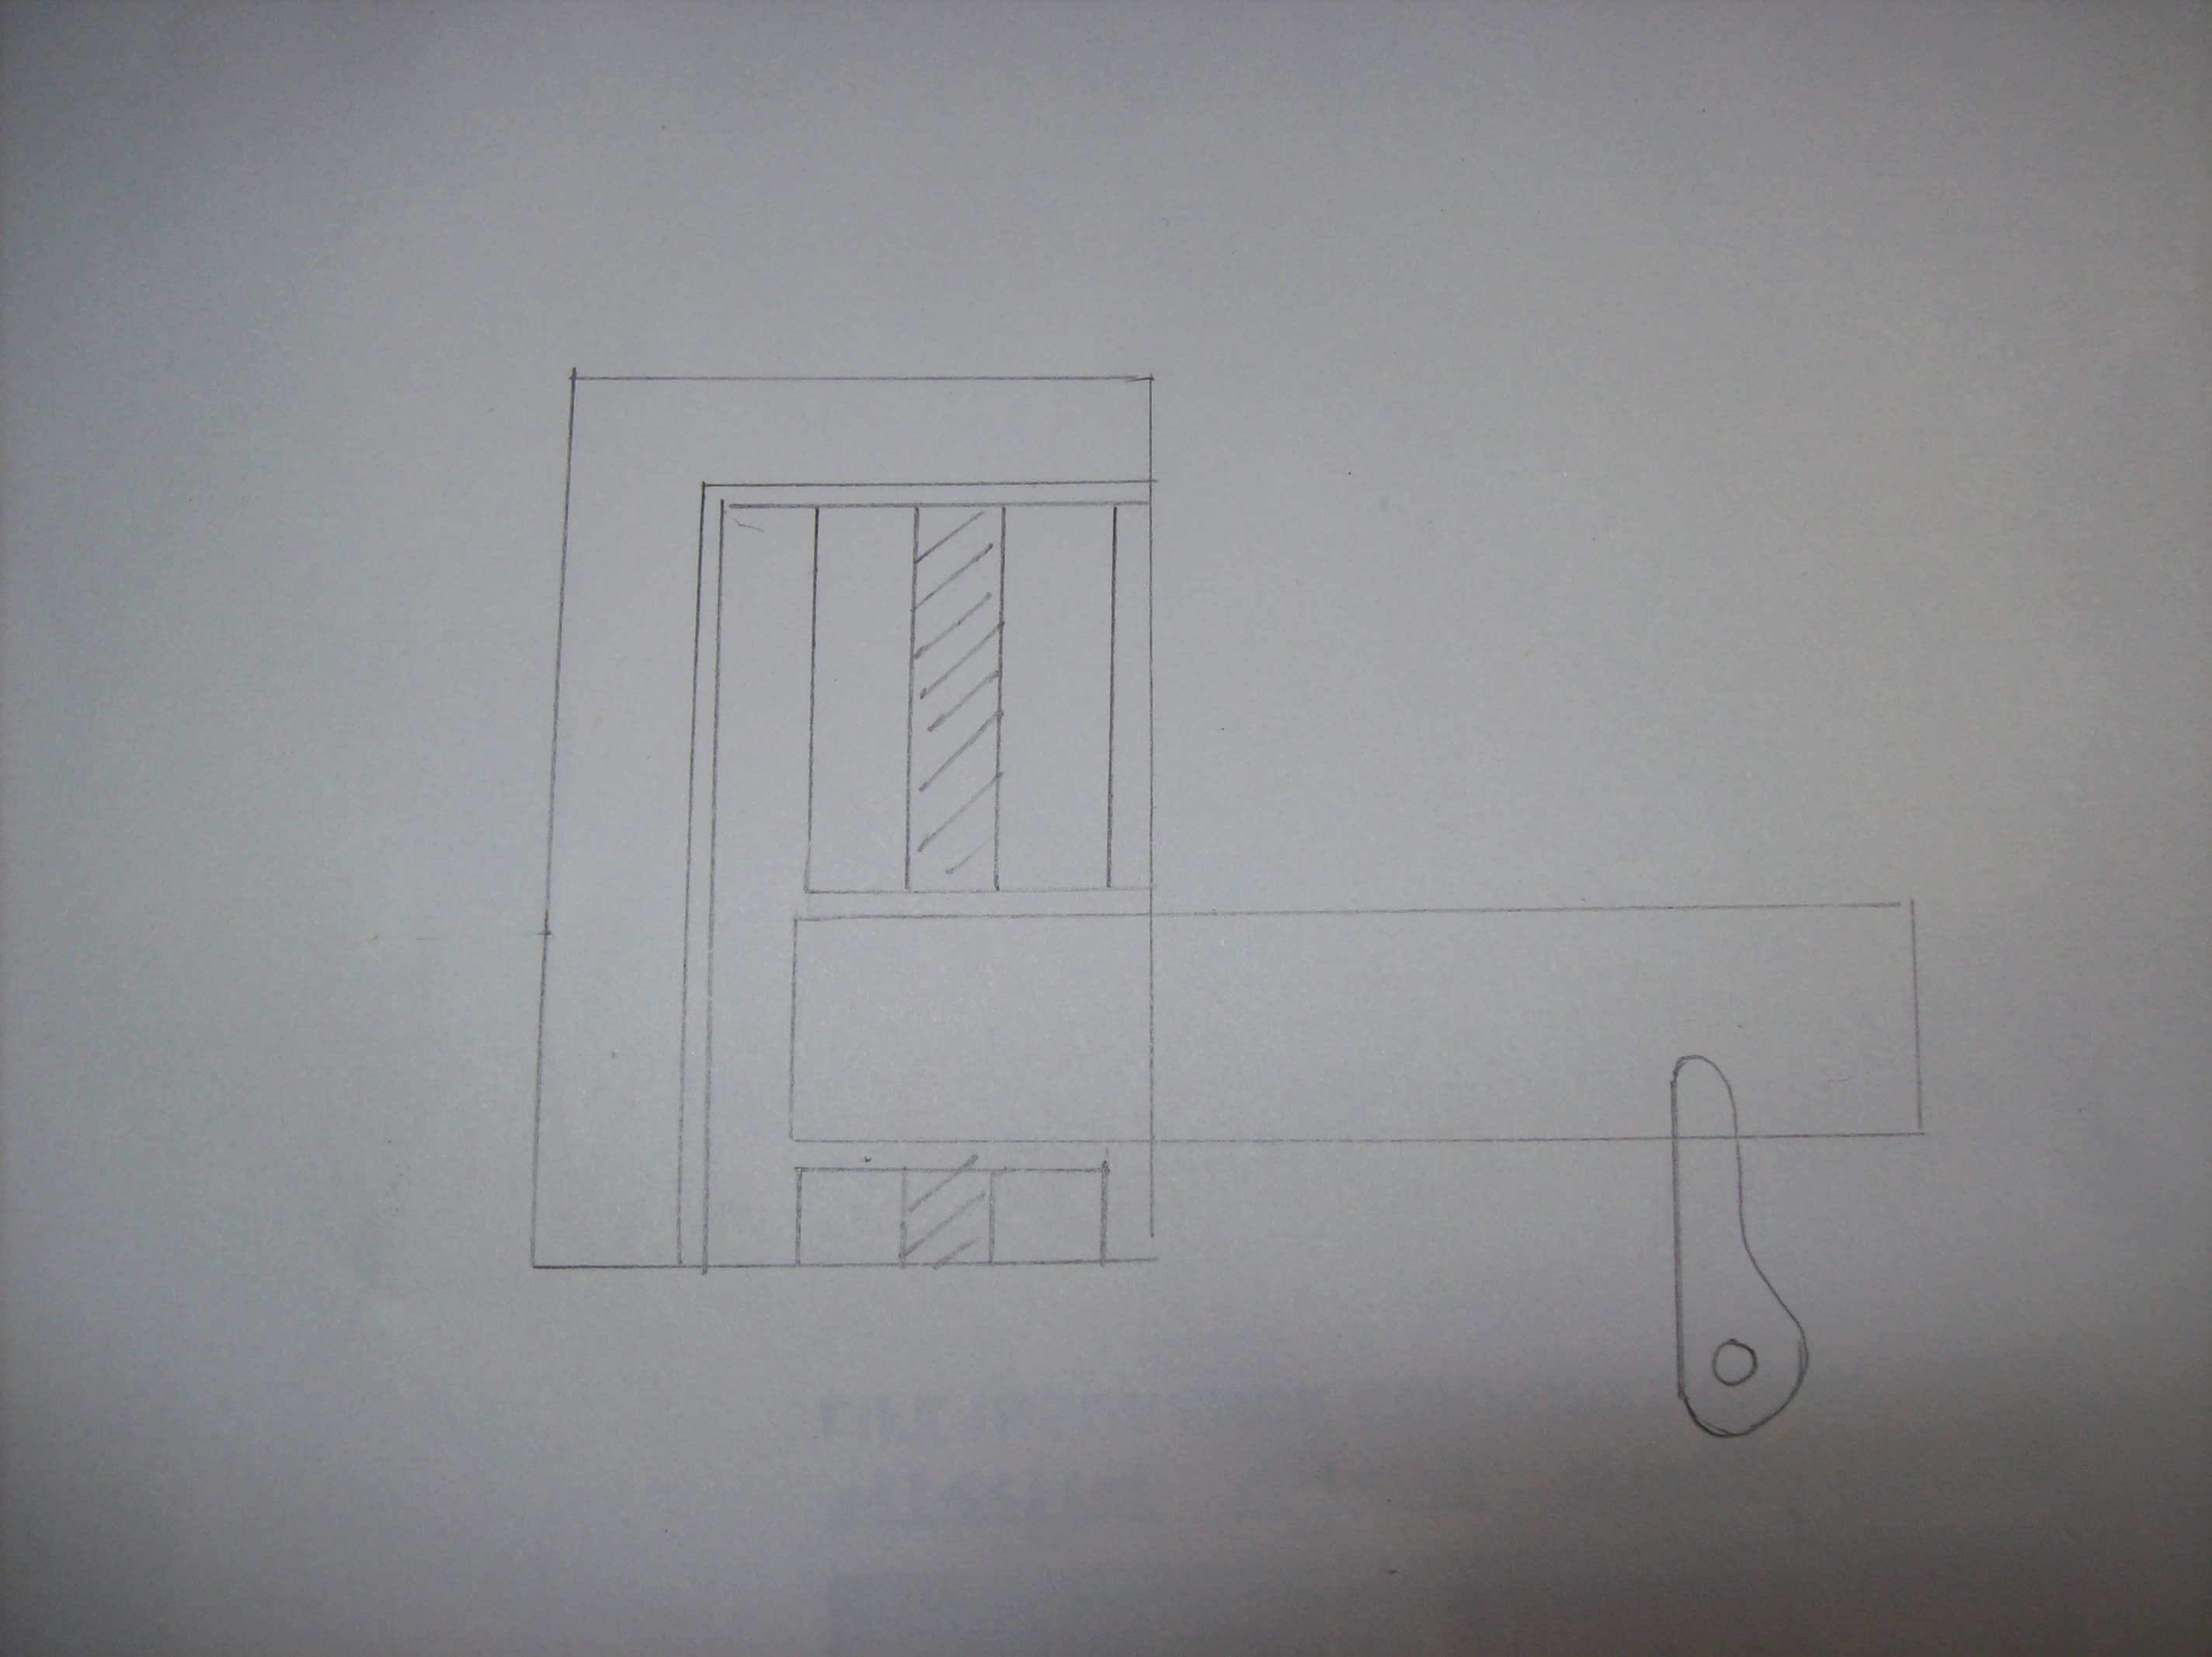
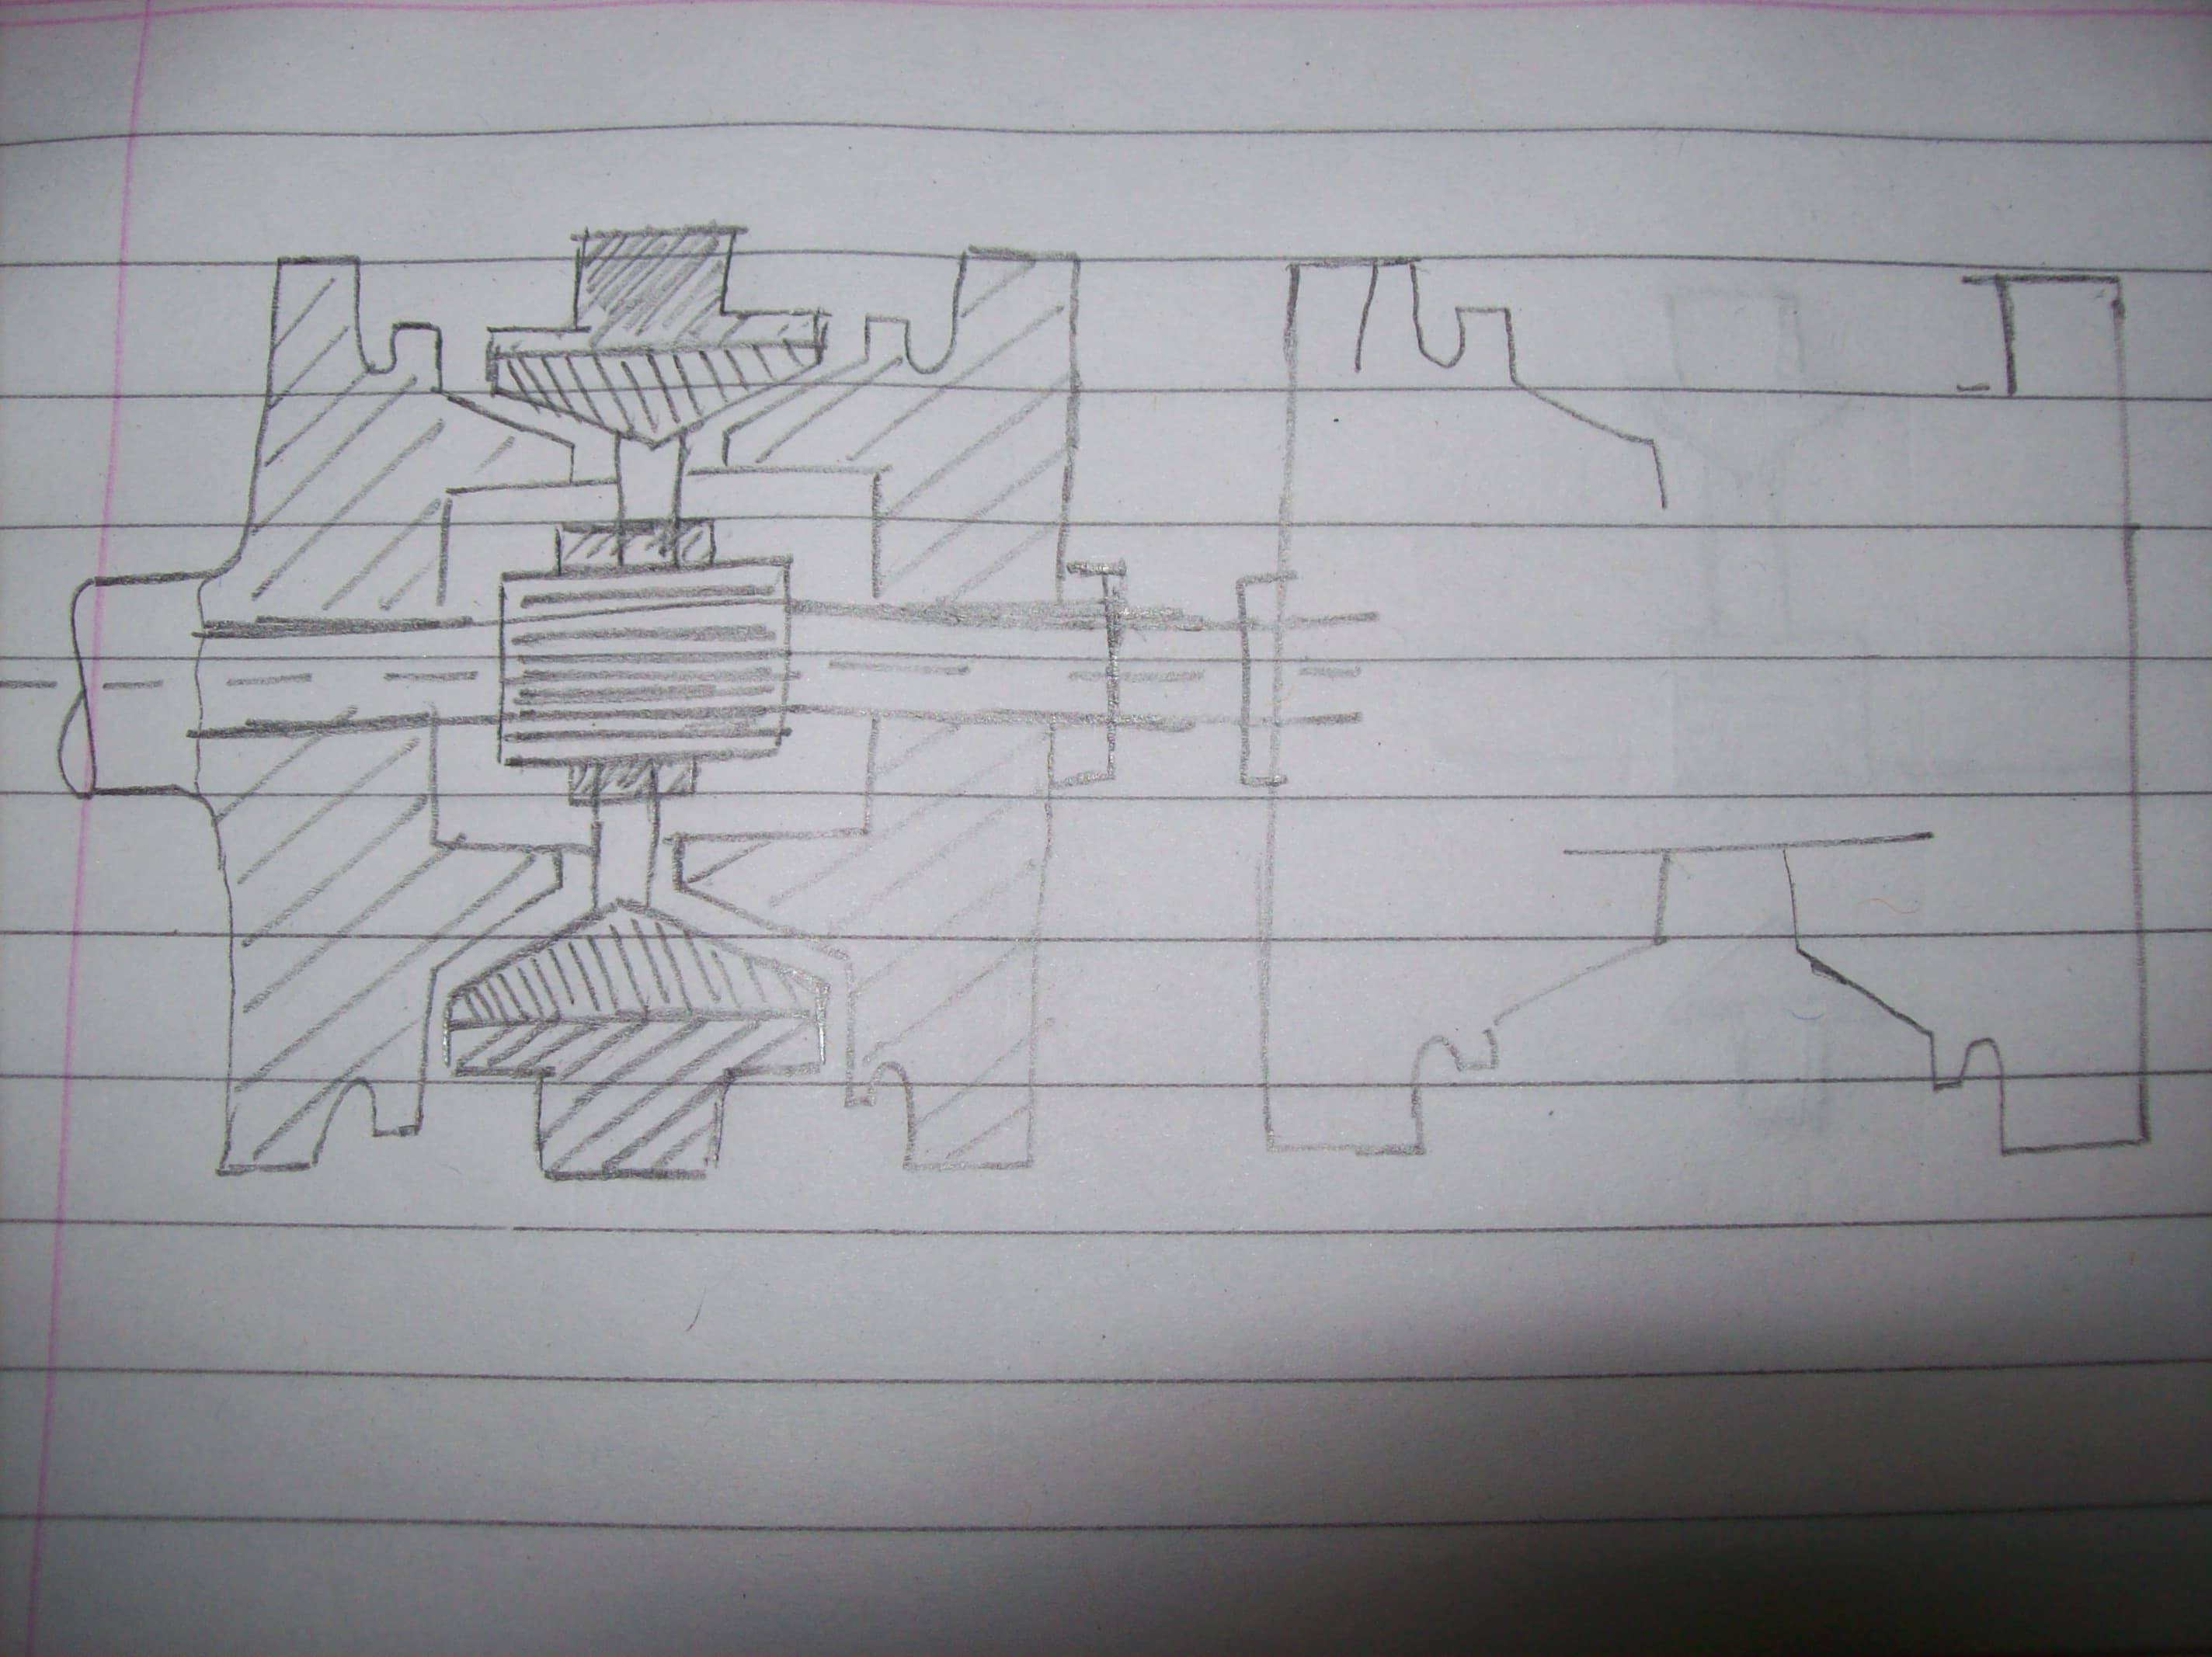
Step 4: Do the same on the other side too, and once done, shade each part to differentiate from each other. Also, draw a similar figure again on the right side (I've left it incomplete since the figures are identical)
Step 5: Then draw a lay shaft below the entire diagram as shown, and add the connecting gears.
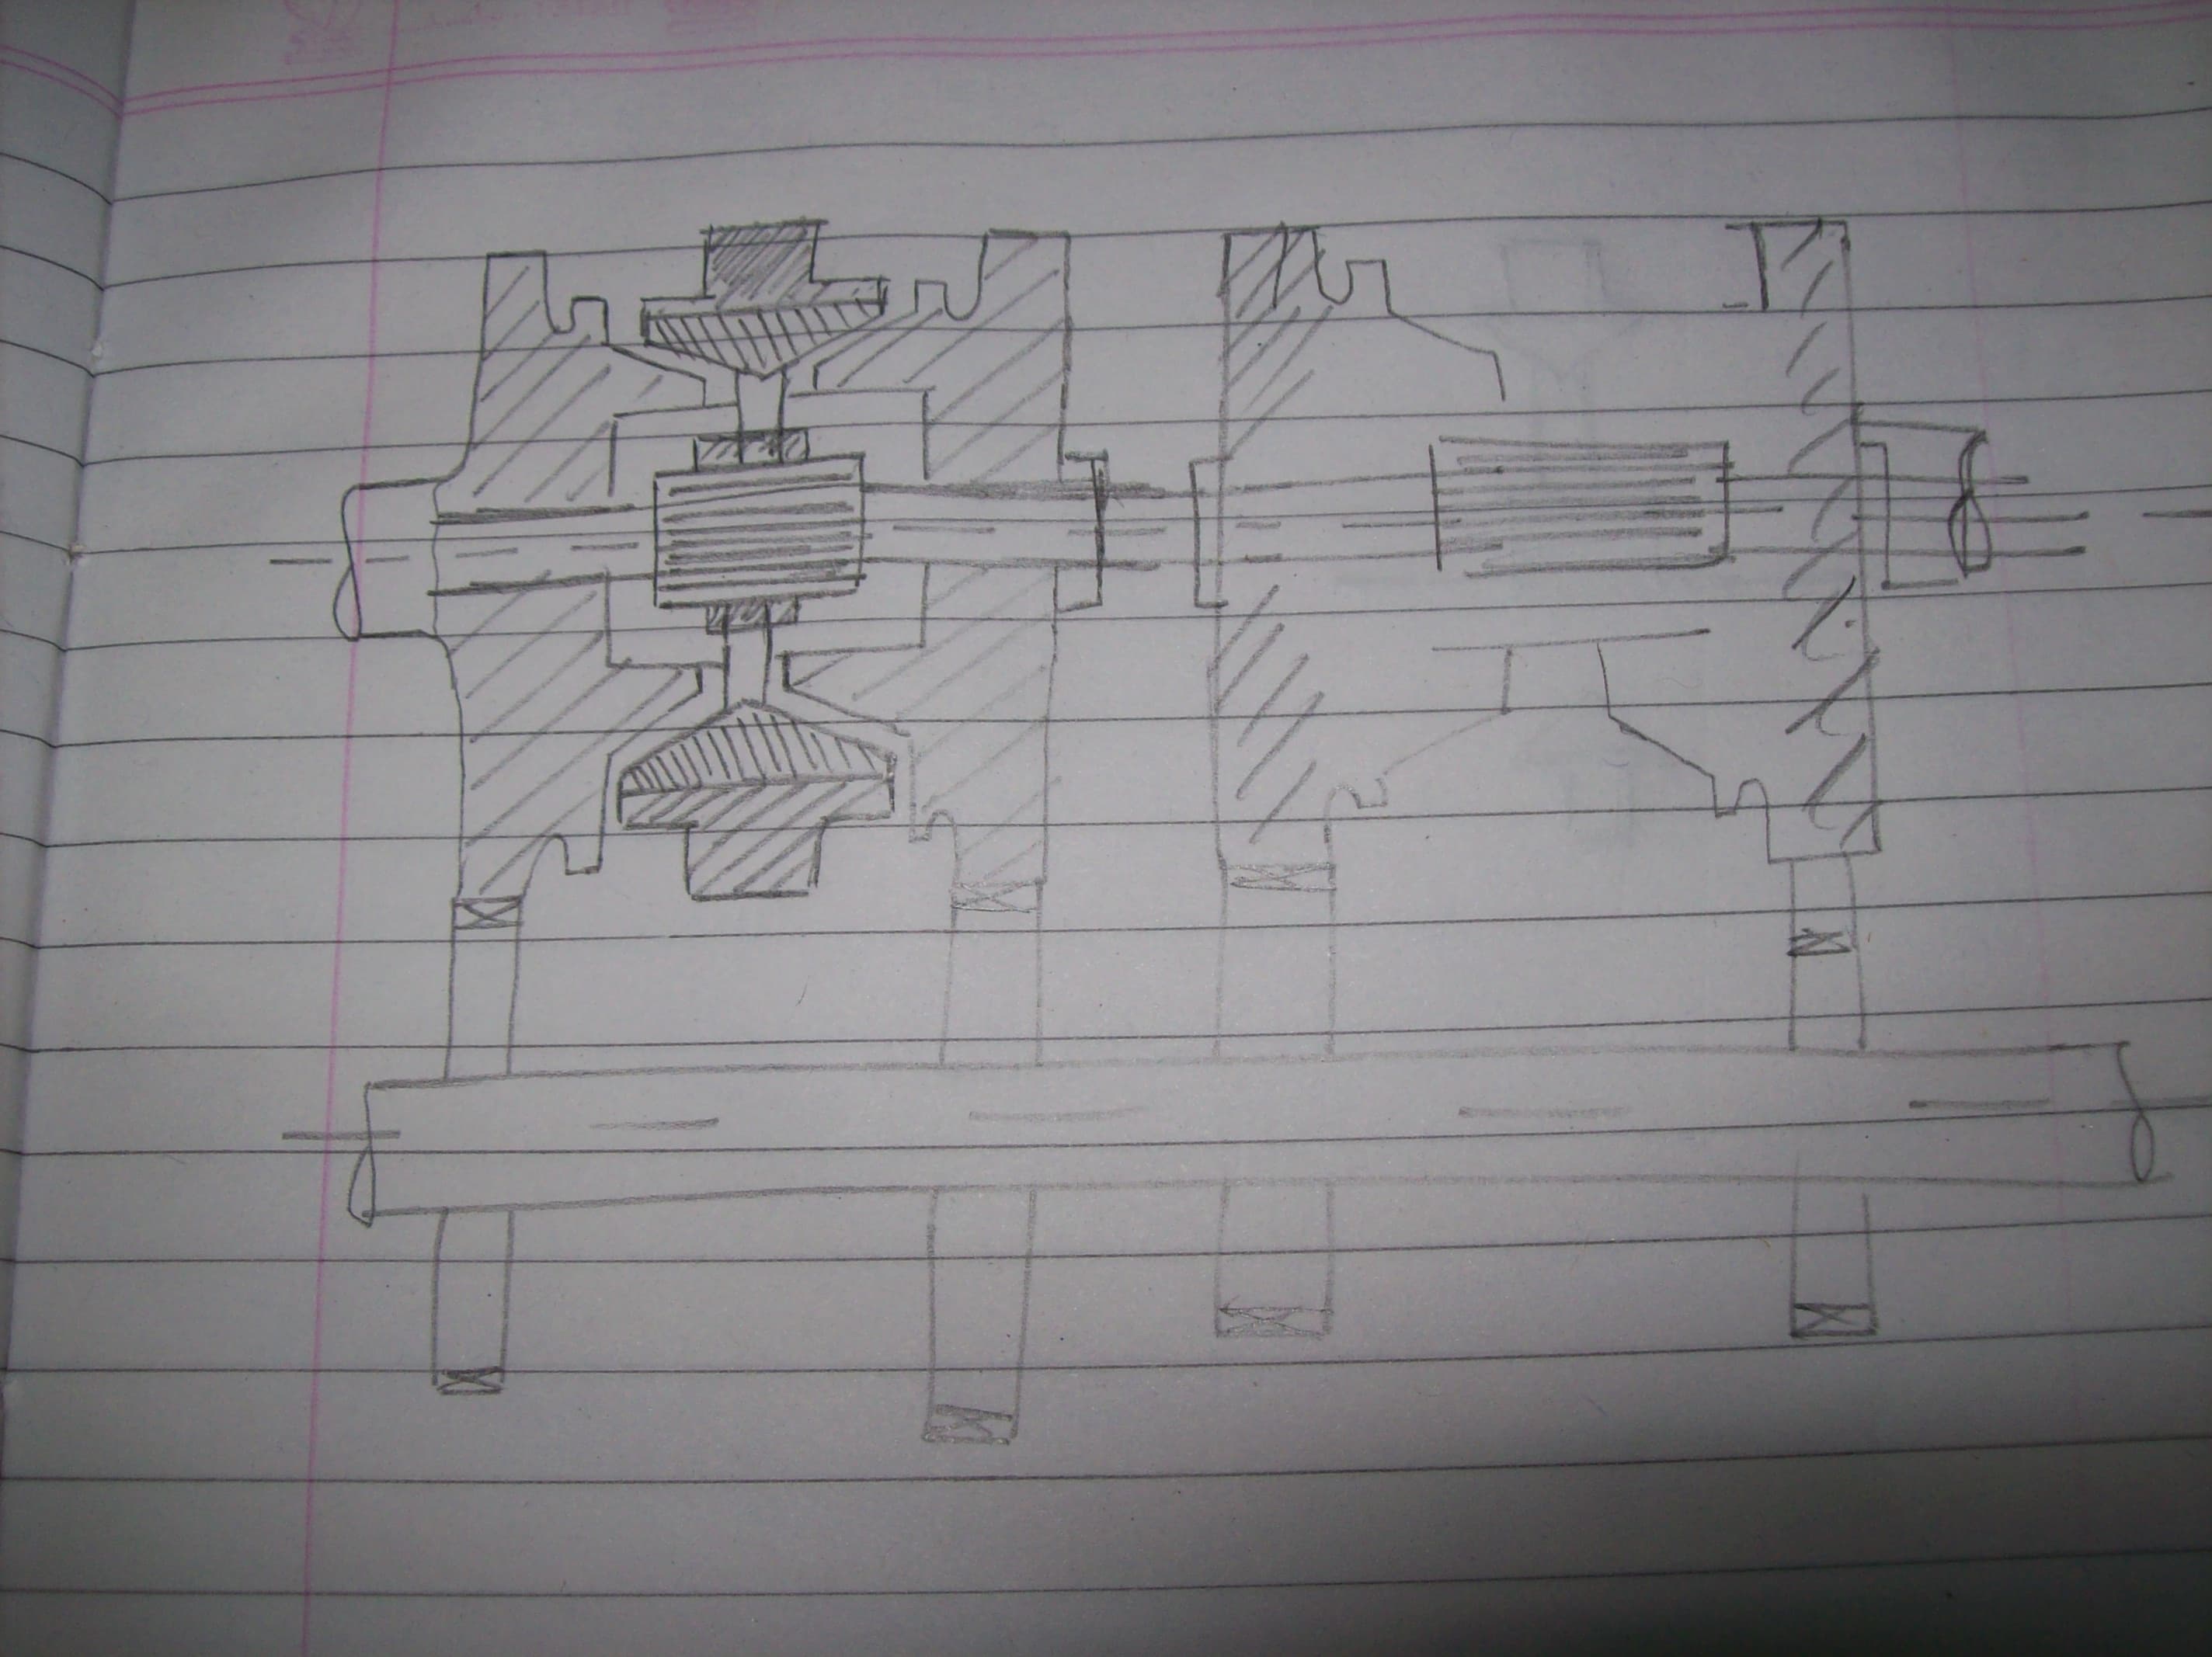
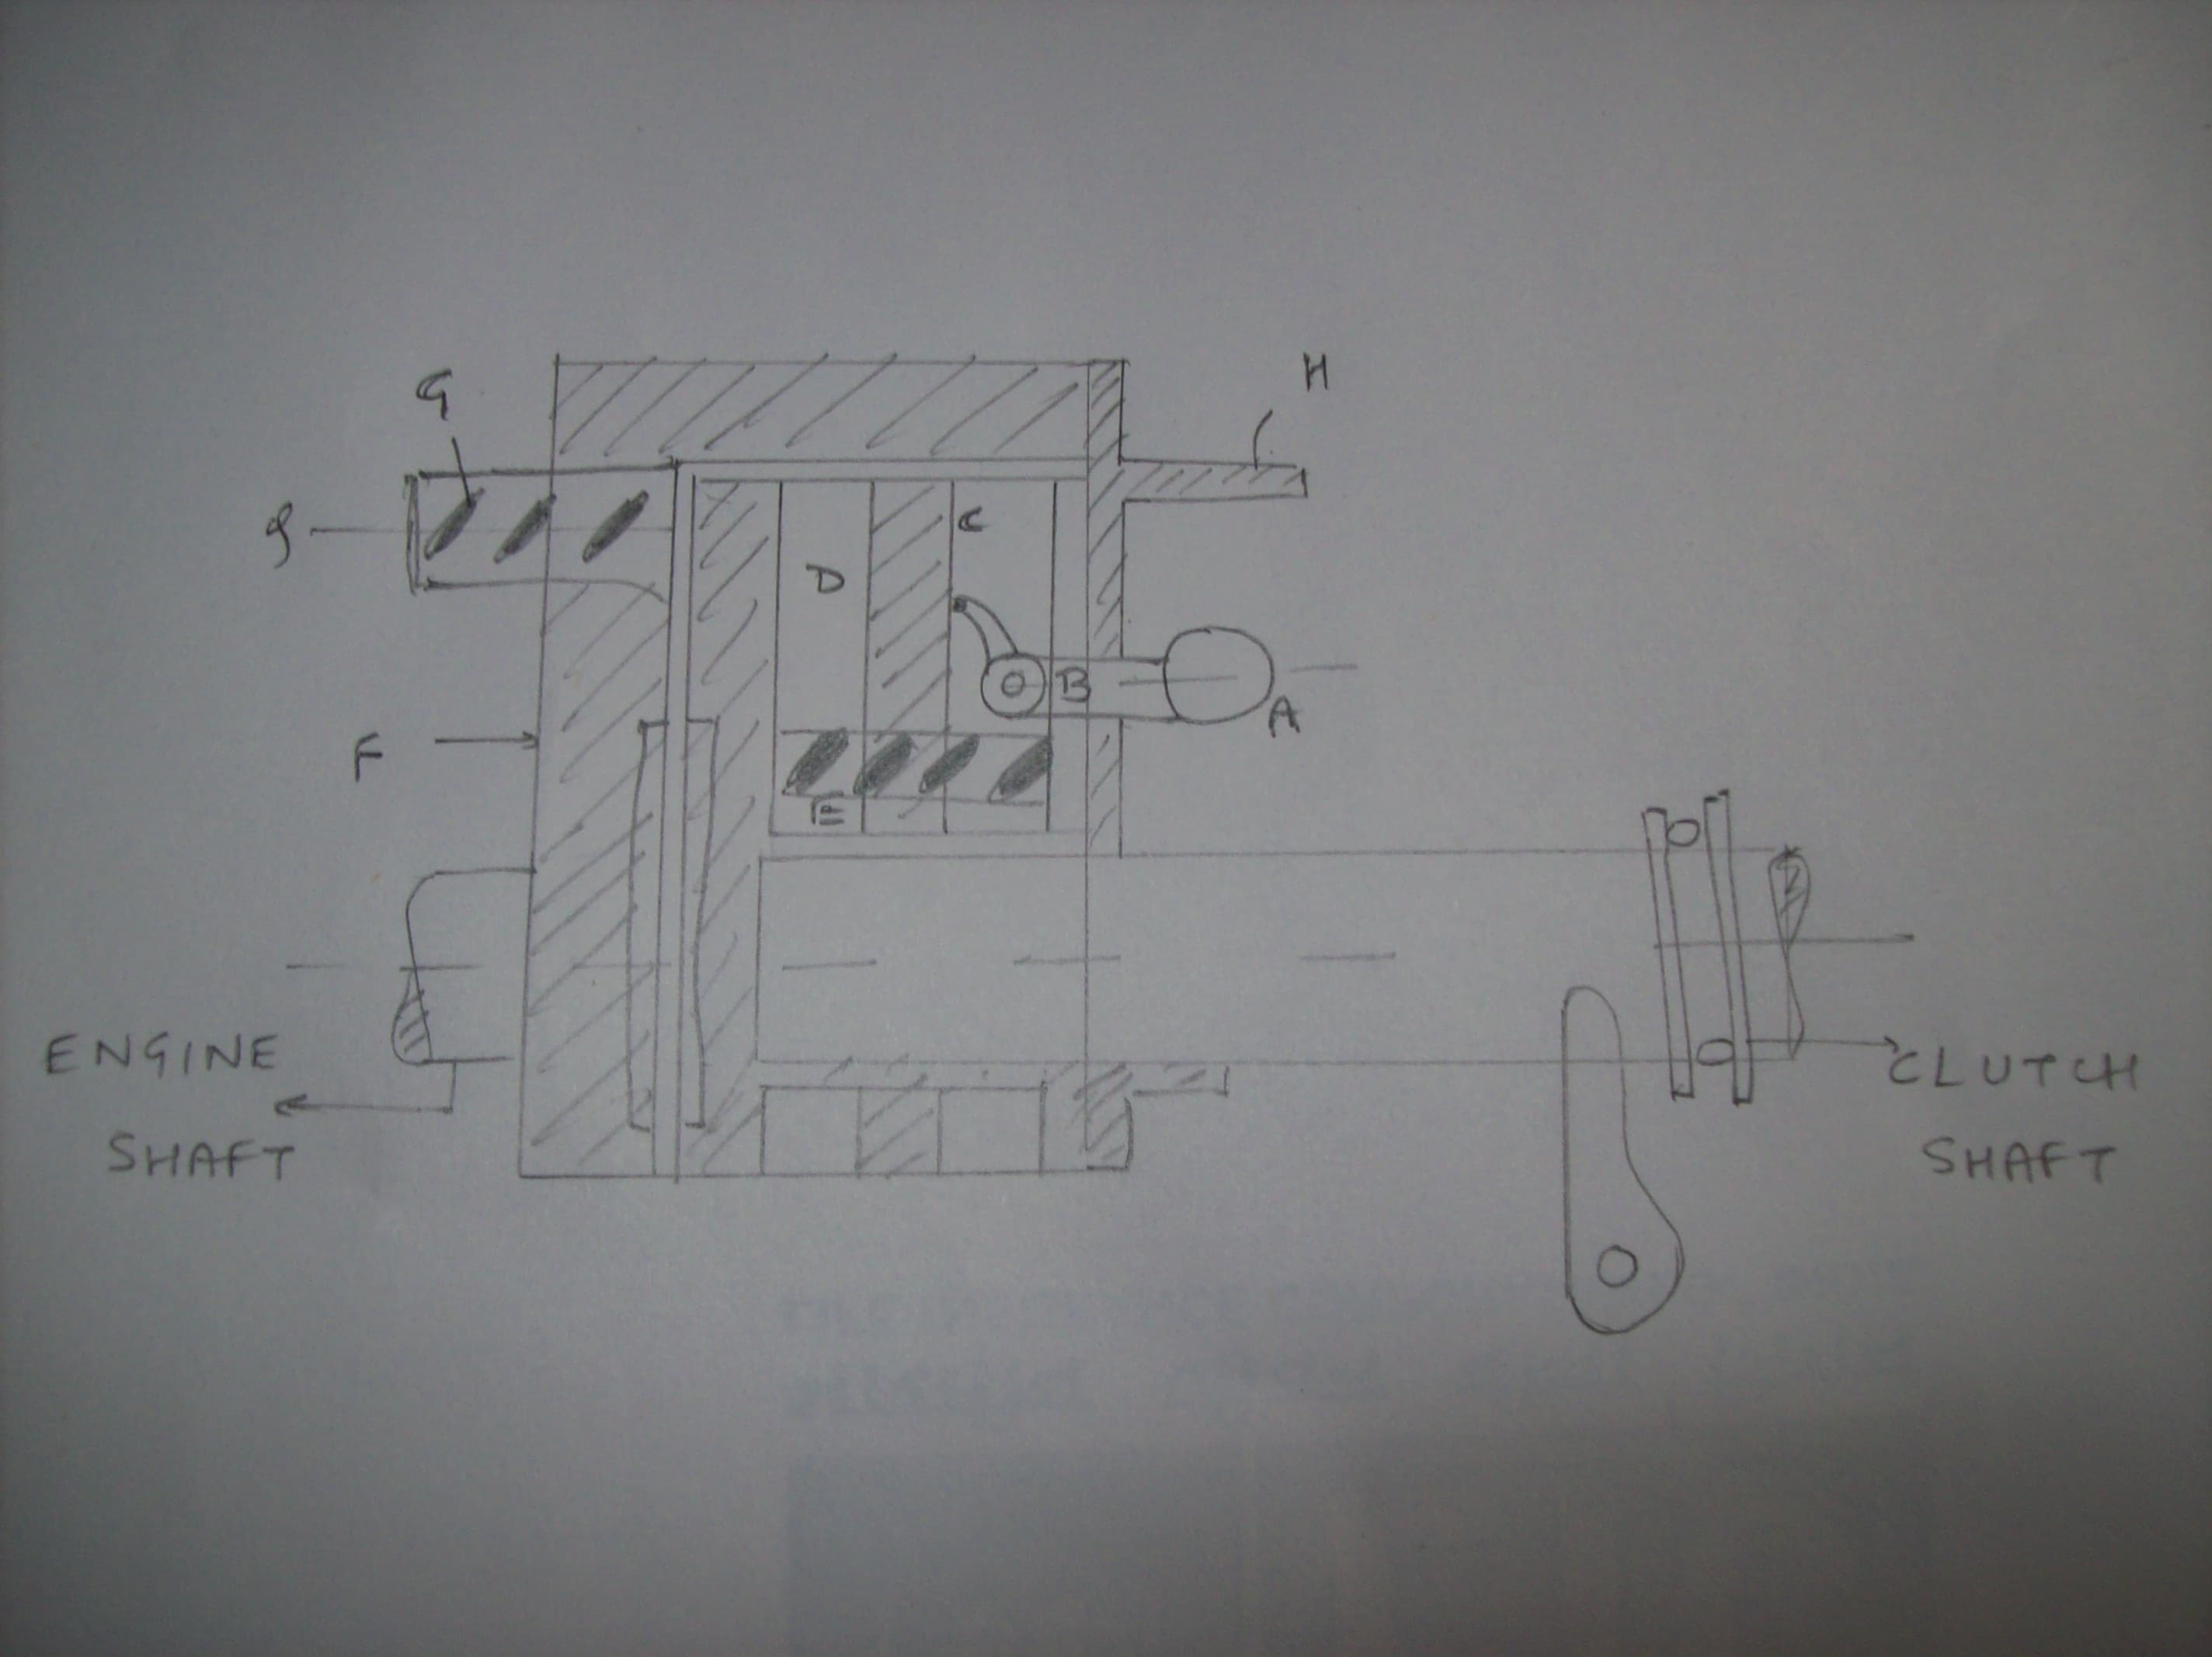
Step 6: The FINAL Diagram-
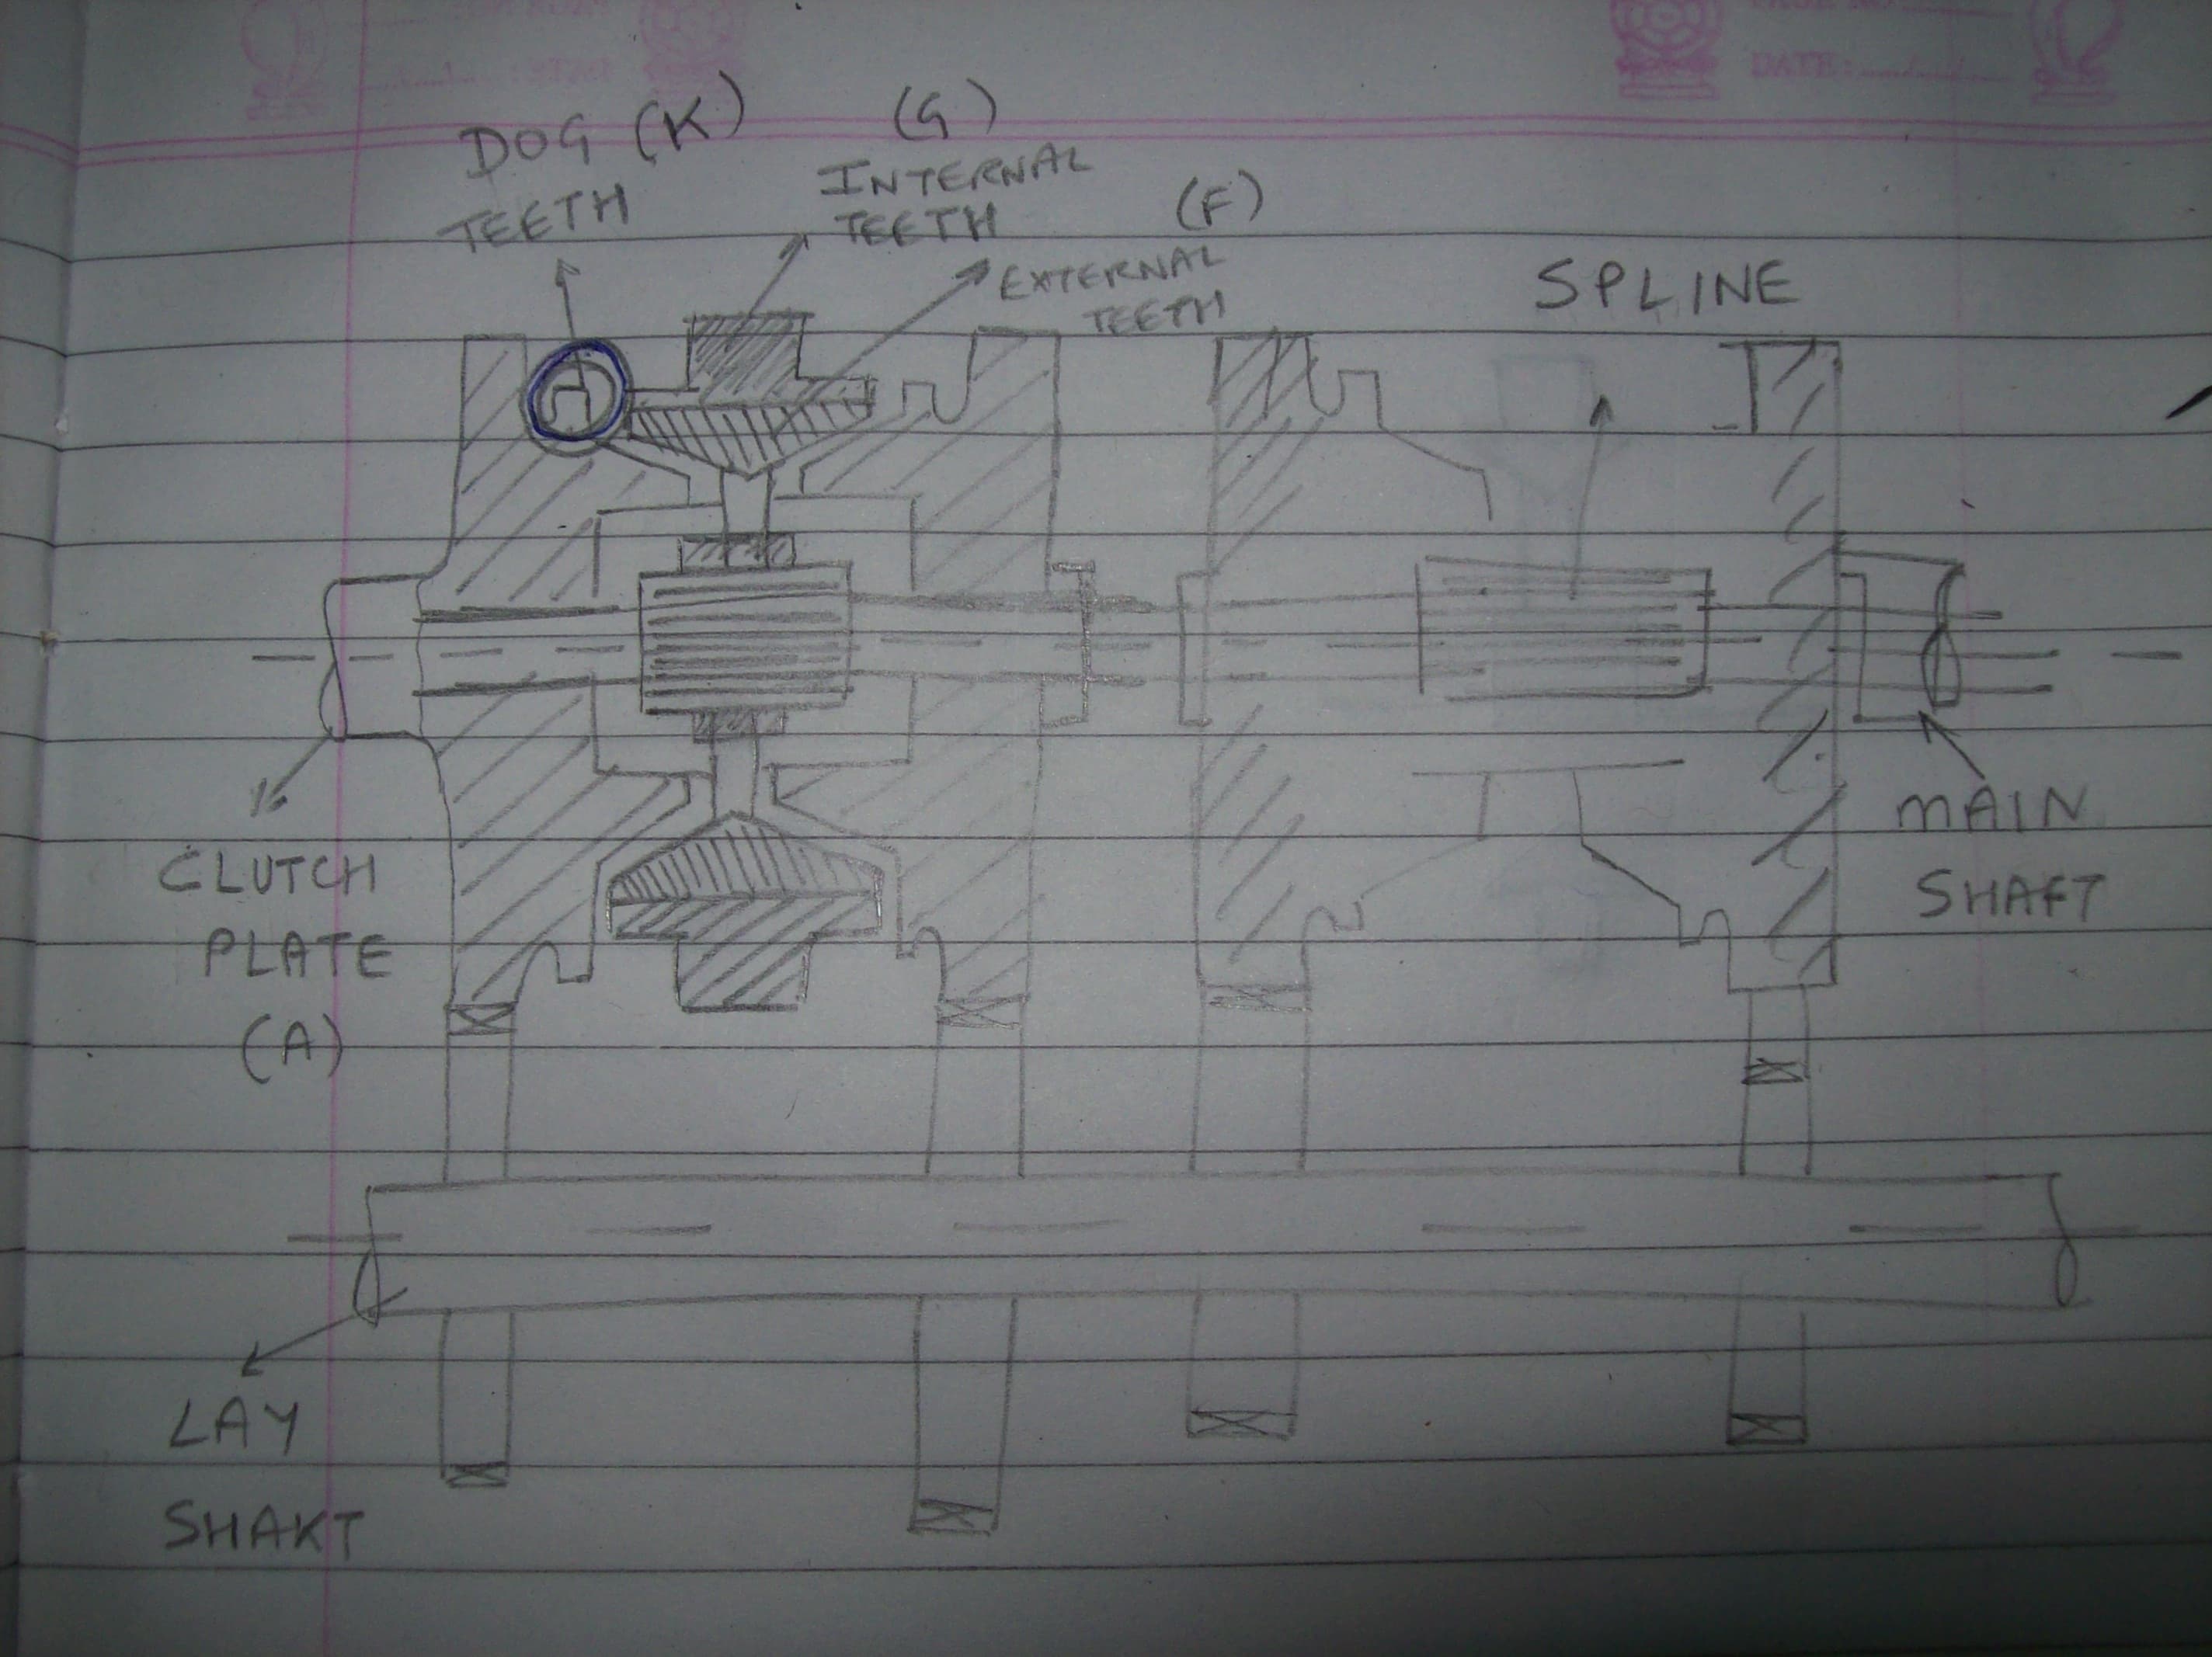
The Dog Teeth has been highlighted. The Cursor like thing has got 2 gears, one with internal teeth, and other with external teeth.
Note that all the gears on main shaft and lay shaft will rotate only when Clutch shaft 'A' rotates.
There, the diagram has been done, just reading the theory once from your book shall be enough now. π -
Ambarish GaneshOk, the initial learnings shall be based on diagrams and flowcharts, and pretty soon I'll be sharing out poems of various Q-As, those have helped me immensely, and I'm sure will help you too. Well, I'm of very little use to the sincere students, but the backbenchers and last-minute book shufflers should find this more than sufficient! Ciao! π
-
Ambarish GaneshSingle Plate Clutch-
The single plate clutch's schematic diagram is something like this.
Looks pretty simple, eh? Wait till you are bombarded with hundred other diagrams throughout the book that'll send your brain for a toss. Here's how we make the diagram simpler:
(And I won't be drawing the entire stuff as it takes a lot of time!)
Step 1:
Rotate the image by a 90 degrees as shown.
Now imagine that the flywheel's a huge field, and three towers(The big one at the center and the smaller ones at either side) stand on the field. Provide some fencing at the smaller towers(those make up for the springs.)
Step 2:
Now, leave a few millimeters above the field, and draw supports for the bigger tower(starting from the smaller towers linearly, and then inclining them from a point) This is your pressure plate.
Now remember, that gap you left earlier, put a clutch plate there.
Note: The clutch plate lies between the flywheel and the pressure plate.
Step 3:
Where the supports end at the bigger tower, start drawing a diametrically larger cylinder, the King's Chamber( the withdrawal sleeve). Note that it has got a clearance above. Once it's done, add a clutch fork to it, and connect it to a pedal via an adjustable link.
Diagram done. Now read the theory once, and smirk! π -
Harshad ItaliyaThread made Sticky ! Good job π
-
Gurjapproper good job mate π
-
Ambarish GaneshThank you #-Link-Snipped-# and #-Link-Snipped-#. More's coming soon!
-
Ambarish GaneshFluid Flywheel-
Now, this is a proper schematic diagram of a fluid flywheel:
Step 1:
Rotate the above image by 90 degrees.
Forget the labeling, just focus on the image here-
What I'm seeing here is a pair of the diver's goggles on a badly deformed nose, and the gearbox shaft could be assumed to be the pipe that goes above the surface of water, helping the diver breathe.
Now, all you need to do is make sure that the pipe is properly attached to the nose and that the goggles are screwed firmly at the ends. Theory/Labeling: From your book.
Diagram done! Go, now show-off to your friends whatay genius you are! π -
Ambarish GaneshI repeat, this is my way of studying/and making others study, which may not go well with *all* the mechanical engineers. I may have made some excellent geniuses turn in their graves, but hell, I'll proceed with whatever's less time consuming and sticks to the memory better. Once the diagram is done, theory is no big deal. That can be done just by looking at the diagram and bluffing a few *sensible* bluffs. Get your basics right, is all I would say! π
-
Ambarish GaneshCentrifugal Clutch:
This is a schematic diagram of the centrifugal clutch:
Note how it resembles this-
Yes. A tap.
Now once you've associated the centrifugal clutch to a tap, the diagram goes as follows-
Step 1: Draw a basic frame that *looks* almost like a tap.
Once this is done, add up the following boxes to the figure as shown,
Add a shaded rod in the middle box. Here-
To the shaded rod just added, attach a connecting rod, and to that connecting rod, join a ball as shown:
After this, add the springs -
Ok, now most of the diagram is finished. Just some last cosmetic touches-
Make sure to put the roof "H" above the ball "A".
Diagram done! Easy-Peasy! π -
Ambarish GaneshHotch-kiss drive:
This is one of the simplest diagram you'll encounter. Still, let's make it even more simpler.
Keyword here: Kiss
Observe how the "Frame" and the "leaf springs" form a lip-like structure around the wheel.
Now the final figure-
Note the pencil-marked labeling over the pins. Front-end of the leaf spring is pinned, while the rear end is attached to swinging shackles. Rest of the diagram is as it is easy. -
zaveriWell those are nice ways of tackling engineering drawings .
-
Ambarish Ganesh#-Link-Snipped-# Thank you! π I'm glad you found them useful.
-
Gurjaphahahaha.......good wordplay on hotchkiss π
-
Dancer_Engineer#-Link-Snipped-#, good job dude! π
Very impressive, making things simple to learn. π -
Ambarish Ganesh#-Link-Snipped-#, #-Link-Snipped-# and #-Link-Snipped-# Thank You! π
Moving forwards, let's simplify the Propeller shaft!
In the above diagram, starting from left, the parts are as follows- Universal Joint, Sliding Joint, Propeller shaft, and again Universal Joint.
Remember U-S-P, and this should do the trick!
Note that both ends are connected to a Universal Joint.
Now look at the Hotchkiss Drive diagram to see one usage of the propeller shaft! π -
zaveri@#-Link-Snipped-#
as for the hotchkiss drive , is that how it originally got its name ? -
Ambarish Ganesh
No, the name comes from its creator, Albert Hotchkiss! πzaveri@#-Link-Snipped-#
as for the hotchkiss drive , is that how it originally got its name ? -
zaveri@ wise_fool
Do you know of a creative way to tackle derivations ? especially the ones in thermodynamics, jet propulsion and gas dynamics ? -
Ambarish Ganesh
Sure thing! PM me the images of whatever you need(a full-sized image of the pages would be great), and I'll get back to you soon! πzaveri@ wise_fool
Do you know of a creative way to tackle derivations ? especially the ones in thermodynamics, jet propulsion and gas dynamics ? -
silent observerimpressed............
please send me sketches of other mechanisms also ........
which book do i refer for easy and practical understanding of AUTOMOBILE mechanisms? Will going to garage for better understanding make difference?
Waiting for reply from any helpful buddy.
Not considering my ongoing studies seriously making me unable to think practically. I think i have that much of potential to be a mechanical engg. in real manner, but something is forcing me back..I THINK IT IS MY LAZYNESS
But still
Let's see, something will definitely happen...But when and how? -
jasonxiaoaha interesting figure.....looking forward with a more detail one to help rookies like me....
-
Ankita Katdare#-Link-Snipped-# Just went through some of those diagrams and found that those must be really easy to remember. People here are loving this, I guess it's time you update this thread. π
Way to go! -
Muhammad_TahaI haven't reached this level in my university .. I'm first year mechanical - cairo university .. but this is really great π
-
Ambarish Ganesh
Let's do it the other way round buddy π Just let me know the topics/mechanisms that have you going nuts and we can surely work something out together! πsilent observerimpressed............
please send me sketches of other mechanisms also ........
which book do i refer for easy and practical understanding of AUTOMOBILE mechanisms? Will going to garage for better understanding make difference?
Waiting for reply from any helpful buddy.
Not considering my ongoing studies seriously making me unable to think practically. I think i have that much of potential to be a mechanical engg. in real manner, but something is forcing me back..I THINK IT IS MY LAZYNESS
But still
Let's see, something will definitely happen...But when and how?
And yes, visiting or working at a garage will definitely lend you a new perspective, but the technology employed now is way too advanced for what we're taught in the books. So I can't say whether they'll land you some more grades, but yes, practically it will be great if you know such stuff! -
sweet_honey#-Link-Snipped-# Synchromesh gear box was a real help..
Thanks for that diagram..
I left that topic to read just seeing its diagram because I felt the diagram tuf.. But now, I'm surely going to go through it..π -
atul-namdeo
really nice work... thankz..The_Wise_FoolSure thing! PM me the images of whatever you need(a full-sized image of the pages would be great), and I'll get back to you soon! π
it would be really very helpfull if u also tell the creative way to tackle derivations...π -
Sarathkumar Chandrasekaranthank you very much for this cute and sinple explanation bro.continue your contribution bro.I Am an Automobile student and i found this thread to be useful.once again thank youuu.
-
Ambarish Ganeshπ Glad it was of value to you, CSK.
I understand that the images I've put up are too huge and take too much time to load. Those with hi-speed internet, cool! Others may simply download the same here (just 598 KB π ) - #-Link-Snipped-# -
Ashraf HZGreat work! Keep it up. I'm not so great in drawing mechanical things in detail. Its a good thing electronic and network diagrams are just lines and boxes π
-
Sarathkumar Chandrasekaranway to go bro.I struggled. so much on fluid coupling,clutch,and synchromesh gearbox during last semester . I am now pleased to see this post and it may help my juniors in my college.thank you Wise Fool.continue your work mannnnnnnn.
-
vikaskumar11233Hi,
Initial or a basic diagram must be a data flow diagram, but your description is really point to point,
I need of explanation of power transmission between front and back side tyres how the power goes with rod pulley driven and driver with diagram, please help me out. -
Ambarish Ganesh
Ok, I'll need to check this out. I'll get back to you soon with an easy getaway. πvikaskumar11233I need of explanation of power transmission between front and back side tires- how the power goes with rod pulley driven and driver with diagram, please help me out. -
Ambarish GaneshHi #-Link-Snipped-#,
It'd be very helpful if you share some written data related to your query. Images of your text-book pages shall do too. π
^This I ask because Googling didn't help much in finding a relevant 'simple' solution. -
Vikram S BargahHey Amber !. Loved your Drawing & dedication towards teaching various mechanical topics. Being an Automobile enthusiast I loved your step by step explanation . Though I did'nt get the technical terms.
GooD GOING BUDDY. Keep it UP π -
Sarathkumar Chandrasekaran@#-Link-Snipped-#
Hi bro.why there is no update on this thread?I would be glad to contribute along with you as i am an automobile student.Let me know your idea on it so that we keep this thread thread alive. -
Ambarish Ganesh@#-Link-Snipped-# Thank you. Glad it was of help. The technical terms are not that important, just remember where to label them in the diagram and you're good to go. π
@#-Link-Snipped-# I don't have an automobile book with me. Made this thread with whatever half-scribbled notes I could find. If you can add more to it then it's great. Go ahead. π -
Sarathkumar Chandrasekaran
Yes bro.I would be back soon .Ambarish Ganesh@#-Link-Snipped-# Thank you. Glad it was of help. The technical terms are not that important, just remember where to label them in the diagram and you're good to go. π
@#-Link-Snipped-# I don't have an automobile book with me. Made this thread with whatever half-scribbled notes I could find. If you can add more to it then it's great. Go ahead. π -
Sarathkumar ChandrasekaranDifferential:A differential mainly helps in transferring torque to the rear wheels in rear wheel drive and specially helps in cornering of four wheelers.
Don't mad at the first look of the real photo of differential as many of th automobile textbooks have.A line sketch of a differential is enough to fetch you good marks and it saves a lot of time.A line sketch can be easily drawn and i followed the same steps of Ambarish to teach it by rotating the figure.All you want to know to draw a differential is that "A square faced king was driven by a queen" lets go to the work CEans.
Step 1:Rotate the differential
Step 2:Ok lets start with the face.First draw the Square faced King
Step 3πrawing of Crown to give the real king look
Step 4πraw the axles both up and down and at the end add wheels .Queen(Pinion) drives the King.
Even a king cannot escape his wife.............
Noteπont miss to draw lines in the face to represent gears.
Just kidding. You had finished your drawing. Post the drawing you want to learn it easy. -
manojCCOh my god that was a great trick, thanks for sharing it. I enjoyed it.
-
Aravinth VDsuper technique it realy work
-
Sarathkumar Chandrasekaran
Happy to hear that it helped you.aravinth samisuper technique it realy work -
Sangee123I feel so screwed for mechanics: statics and dynamics π. My friends are all planning to fail it, just to retake it. But, I dont want to retake it. I am no creep, I actually was
searching for some solution on google, when I ended up on this page. -
Ambarish Ganesh
I did have similar notes on Mechanics and Kinematics. The content's not with me presently, but do let me know the important topics you are dealing with (important both concept-wise and scoring-wise), and I'll see how I can help you. You are definitely not failing this paper!Sangee123I feel so screwed for mechanics: statics and dynamics π. My friends are all planning to fail it, just to retake it. But, I dont want to retake it. I am no creep, I actually was
searching for some solution on google, when I ended up on this page. -
Sangee123I am just going to say all the topics, so if anyone has info on it; it would save my life! Rigid bodies:equivalent systems of forces, centroids and centers of gravity, analysis of structures, moments of inertia, systems of particles, kinematics of rigid bodies, plane motion of rigid bodies (forces and acceleration). By the way, thanks 4 the offer!!!
-
Ambarish Ganesh
That's a huge list. Let me see what I can get. If possible PM me the scanned images of these from the book.Sangee123I am just going to say all the topics, so if anyone has info on it; it would save my life! Rigid bodies:equivalent systems of forces, centroids and centers of gravity, analysis of structures, moments of inertia, systems of particles, kinematics of rigid bodies, plane motion of rigid bodies (forces and acceleration). By the way, thanks 4 the offer!!! -
Sangee123Haha, I dont know how to private message on this site! LOL. If you dont mind, If I can get your email, I will just send you the pdf. The hardest topics are the rigid bodies chapters and, moments of inertia. I have tried everything for this class, even switched tutors many times, but the good ones are too busy to help
-
Kamlesh VoraYou remind me my class room free hand drawing of Single Plate Clutch....
-
SIVAKUMARG
---Ambarish GaneshSingle Plate Clutch-
The single plate clutch's schematic diagram is something like this.
Looks pretty simple, eh? Wait till you are bombarded with hundred other diagrams throughout the book that'll send your brain for a toss. Here's how we make the diagram simpler:
(And I won't be drawing the entire stuff as it takes a lot of time!)
Step 1:
Rotate the image by a 90 degrees as shown.
Now imagine that the flywheel's a huge field, and three towers(The big one at the center and the smaller ones at either side) stand on the field. Provide some fencing at the smaller towers(those make up for the springs.)
Step 2:
Now, leave a few millimeters above the field, and draw supports for the bigger tower(starting from the smaller towers linearly, and then inclining them from a point) This is your pressure plate.
Now remember, that gap you left earlier, put a clutch plate there.
Note: The clutch plate lies between the flywheel and the pressure plate.
Step 3:
Where the supports end at the bigger tower, start drawing a diametrically larger cylinder, the King's Chamber( the withdrawal sleeve). Note that it has got a clearance above. Once it's done, add a clutch fork to it, and connect it to a pedal via an adjustable link.
Diagram done. Now read the theory once, and smirk! π
- fantastic ! Diagrams greatly simplified !! i wonder if i had such tutors then ...Ambarish GaneshSingle Plate Clutch-
The single plate clutch's schematic diagram is something like this.
Looks pretty simple, eh? Wait till you are bombarded with hundred other diagrams throughout the book that'll send your brain for a toss. Here's how we make the diagram simpler:
(And I won't be drawing the entire stuff as it takes a lot of time!)
Step 1:
Rotate the image by a 90 degrees as shown.
Now imagine that the flywheel's a huge field, and three towers(The big one at the center and the smaller ones at either side) stand on the field. Provide some fencing at the smaller towers(those make up for the springs.)
Step 2:
Now, leave a few millimeters above the field, and draw supports for the bigger tower(starting from the smaller towers linearly, and then inclining them from a point) This is your pressure plate.
Now remember, that gap you left earlier, put a clutch plate there.
Note: The clutch plate lies between the flywheel and the pressure plate.
Step 3:
Where the supports end at the bigger tower, start drawing a diametrically larger cylinder, the King's Chamber( the withdrawal sleeve). Note that it has got a clearance above. Once it's done, add a clutch fork to it, and connect it to a pedal via an adjustable link.
Diagram done. Now read the theory once, and smirk! π -
lv dantwo cursor-shaped things facing each other on either side of the shaft,more information you ca get in.
You are reading an archived discussion.
Related Posts
i have completd my b.tech in 2011 in eee. presently m employd in an automation company as maintenence engineer. but m more intrst in application side which needs knowledge of...
Ever wondered who created the meme? It is Christopher Poole an American Web Entrepreneur. He is touted as the most successful web Entrepreneur you can ever meet.
Recently I came...
i m an engineer in comp sci , bt dis is nt where my world end, d journey start 4m here.
i m person with mass communication skill i love...
I am Akshay Kumar Sahoo. Civil Structures rarely collapse! I'm attaching my CV. Check it out!
Perhaps more than all other federal agencies, NASA tells stories about big things: big places, big data, big ideas. Using extraordinarily high resolution data sets from some of the most...