Steps to cut regular SIM card to nano SIM card for iPhone 5

If you are looking for steps to cut any regular SIM card to nano SIM card for the upcoming iPhone 5, you're looking at the right page. Before I write down the steps, I want to put a disclaimer that I have not tried the steps yet and have no plans of acquiring an iPhone. I'd strongly recommend trying out these steps on a cardboard replica of your regular SIM card first and then try it on your real SIM card. If you have a spare SIM card you might want to try these steps on it first. Because if things go wrong, there is no way to go back (CTRL+Z). If things go wrong, the only option you will have is to buy a new SIM card and try everything again. You've been warned.
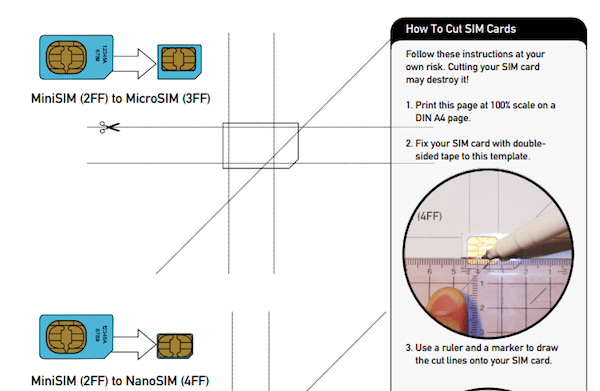
Step 1: Download the attached template (below) on your machine and take a print-out of it. Make sure that you print out on 100% scale so that you don't mess up with the sizes. A4 is the standard size that every printer supports.
Step 2: Get a two-sided tape and fix your SIM card to the paper. Make sure that it's fixed properly because you surely don't want to go wrong on the lines. Double check the boundaries along the side of the SIM card.
Step 3: Now fix your ruler along the marked lines and draw the lines on the SIM card with a sharp market. I'd recommend a 0.5mm marker for better results. Once you've drawn the appropriate lines, use a scissor to cut along the lines.
Cutting the SIM card won't affect its functionality because the actual magic happens at a much smaller space in the SIM card. Take a look at the central region where the microchip resides. You might even grind the plastic side of your new nano SIM to make it fit properly in the nano SIM slot - you'll have to do this to make the edges round.
If anyone of you does this, please add extra tips you might might want to offer.
Source: #-Link-Snipped-#
0